How to Configure Extra Input and Output to Trigger Barrier Gate via Loop Detector on xPortal3000 Software
Problem (Issue) Statement: | How to configure extra input and output to trigger barrier gate via loop detector on xPortal3000 Software |
Description: | A guide to set up Loop Detector as Input in xPortal3000 Software to trigger (Open) barrier gate. To open the barrier gate automatically when car pass by. |
Related Software: |
|
Related Hardware: |
|
System Application: |
|
Symptom and Finding: | NA |
Cause: | .For first time guide to set up configure Loop Detector as Input in xPortal3000 Software to trigger (Open) barrier gate. |
Solution: | Summary:
. Step-by-step Guide:
Step 1: After adding Connection, Controller and Door, users must add an alarm controller. . Step 2: Go to xPortal3000 Client > Control Panel > System Setting > Alarm Panel. . Alternatively, users can also go to xPortal3000 Client > Hardware > Alarm Controller. . Step 3: The Alarm Controller Setup window will be shown > Click Add. . Step 4:The Add Alarm Controller window will be shown. Fill the details and specify controller point with, click OK to continue. . Note At the Controller field, select the controller that Loop Detector is connected to . . . . .
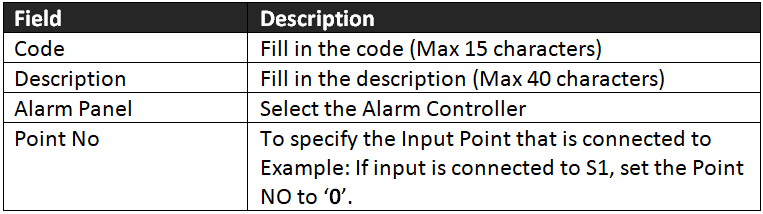
Step 1: Go to Control Panel > System Setting>Input. . Alternatively, users can also go to Hardware>Input. . Step 2: The Input Setup window will be shown. Click Add. . Step 3: The Add Input window will be shown. Fill in the details according to the table as below. .
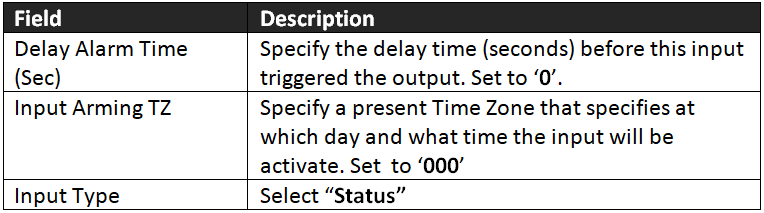
. Step 4: The General Settings tab, fill in the details according to the table as below. Click Ok to continue. .
. Step 5: The following xPortal3000 Client message will be showing and indicateRecord Added. Click OK to continue. . Step 6: Next, software will prompt the Delivery Report window to send input setting to controller. Ensure that the send data process is completed without any errors. . Step 7: User will return to the Input Setup page. Click Close to exit. . .
Step 1: Go to Control Panel > System Settings > Output. . Alternatively, users can also go to Hardware > Hardware Settings > Output. . Step 2: The Output Setup window will be shown. Click Add. . Step 3: The Add Output window will be shown. Fill the details according to the table below. .
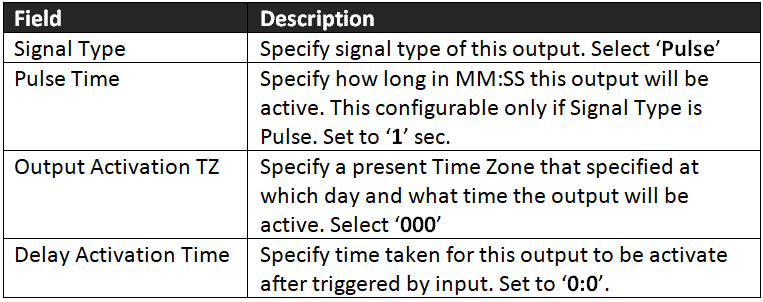
. Step 4: Go to General Setting tab, fill in the details according to the table as below. .
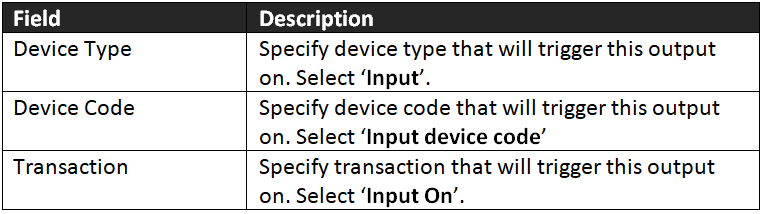
. Step 5: Next, select Event Trigger On tab. Fill in the details onEvent Trigger Onsection accordingly. Click OK to continue. .
. Step 5: The following xPortal3000 message will be show and indicate Record added,click OK to continue. . Step 6: Next, the software will prompt the sending output setting to controller. Ensure that the send data process is completed without any errors. . Step 7: User will return to the Output Setup page. Click Close to continue. . .
Step 1: When the software configuration for Input and Output completes, if the software is unable to send Input & Output settings to controller, the following error message will be shown to indicate that the software "Cannot proceed because the controller is down". . Step 2: Users will then be required to send Input and Output settings manually to the respective controller. If the error message is not shown, please ignore the following steps and proceed to the following section to verify input/output transaction at the Latest Event Transaction . Step 3: Go to Device List > Controller List tab to ensure the respective controller status is UP. . Step 4: Next, go to Device Comm > Send Door Setting. The Send Door Controller Settings window will be shown. . Step 5: Select the respective controller and click Send All Setting. . Step 6: The Send Data and Command window will be shown as below, please wait a while. . Step 7: Next, the Delivery Report will shown once the send data to controller process is completed. Ensure that the send data process is without any error as it may affect the controller functioning. Click Close to continue. . .
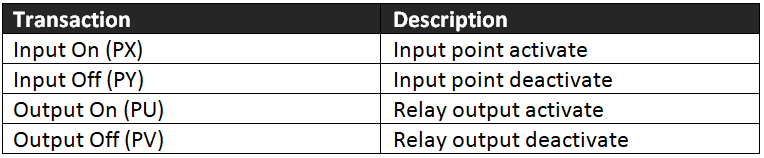
Step 1: User may go to xPortal3000 Client to monitor transaction from controller at Latest Event List window shown as below. . Step 2: The activated input point will trigger the barrier gate to open, and the following transactions will be recorded in the Latest Event List window as shown below. The table that follows provides more details of the transaction recorded by the software. .
|
Common Issue | NA |
Date Documentation: | 2/5/2020 (Rev 1.0) |


PROOF-READ
.
Related Articles.
Containing the label "barrier-gate"
.
.
© MicroEngine Technology Sdn Bhd (535550-U). All rights reserved.