How to Configure Legacy XP-GT or XP-GTR Controllers Using Network Connection
| Problem (Issue) Statement: | How to configure legacy XP-GT or XP-GTR controllers using network connection |
| Description: | XP-GT3200 / XP-GTR1200 controllers can connect to the Server PC running the xPortal software via network connections. This article will guide users on how to configure legacy XP-GT or XP-GTR controllers using network connection. |
| Related Software: |
|
| Related Hardware: |
|
| System Application: | NIL |
| Symptom and Finding: | NIL |
| Cause: | For first time guide on how to configure legacy XP-GT or XP-GTR controllers using network connection. |
| Solution: | Summary:
. Step-by-step Guide:
Step 1: Please perform the pre-configuration step for the network connection. Knowledge Base Link Users may refer to How to Pre-configure Network Connection for IP Controllers for the complete pre-configuration procedures. . .
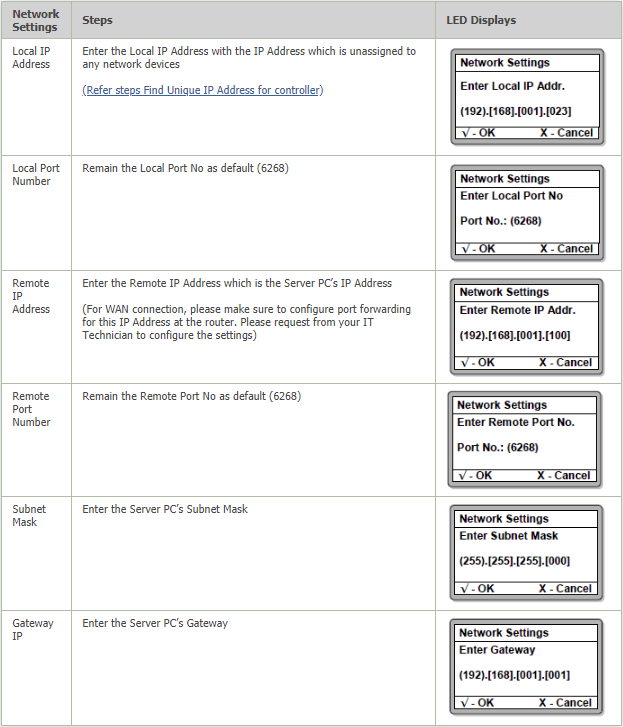
Step 1: Users have to first identify the Server PC's IP address. Open Windows Command Prompt, type "ipconfig", and press Enter. Note down the IPv4 Address. Step 2: At the controller, enter Programming Menu Knowledge Base Link Users may refer to How to Enter into Programming Menu for Legacy XP-GT or XP-GTR Controllers for the complete steps on how to enter into Programming Menu. . . Step 3: Press 1 for System Menu > 7 for Network Settings. Follow the steps as highlighted in the following table. .
. Step 4: Press the X key to return to the System Menu. Users will then be prompted to confirm saving the changes before exiting in the following window. Press the " . Step 5: Power off and re-power on the controller again to reset the controller in order for the changes to take effect. . .
Step 1: Go to xPortalNet Server > Server Admin > Connection Setup > Add. The Add Connection window will be shown. Configure the settings as shown in the screenshot. Click OK to save the changes. . Step 2: Go to xPortalNet Server > Server Admin > System Device Setup > Controller > Add. The Add Controller window will be shown. Configure the settings as shown in the screenshot. Click OK to save the changes. . Step 3: Go to xPortalNet Server > Server Admin > System Device Setup > Door > Add. The Add Door window will be shown. Configure the settings as shown in the screenshot. Click OK to save the changes. . Step 4: The newly added controller and door should have the status of "Up" in the Device List window. .
. Step 5: Users are advised to send the door settings to the controller. Go to xPortalNet Client > Device Comm > Send Door Settings > Select Controller > Send All Settings. . Step 6: At the controller's LCD screen, ensure that the PC icon at the top right corner is blinking, indicating that the controller successfully established communication with the Server PC. |
| Common Issues: | NIL |
| Porting Date: | 2/4/2019 |


PROOF-READ
.
.
.
© MicroEngine Technology Sdn Bhd (535550-U). All rights reserved.