How to Pre-configure Network Connection for IP Controllers

Problem (Issue) Statement:

How to pre-configure network connection for IP controllers

Description:

A guide to perform pre-configuration settings on network connection for IP controller.

Related Software:

  • xPortalNet HS v1.8
  • xPortalNet v1.5
  • xPortal3000

Related Hardware:

  • XP-M1000i / XP-M1300i
  • XP-M2000i / XP-M2300i
  • XP-SNET / XP-SNETv4
  • XP-GT3500 / GTR1500
  • XP-GLS Series

System Application:

NA

Symptom and Finding:

NA

Cause:

For first time pre-configuration settings on network connection for IP controller.

Solution:

Step-by-step Guide:

  • Method 1: To prevent apps from being blocked by Windows Firewall by allowing MicroEngine program through the Windows Firewall:

Step 1: Connect the controller and Server PC to a network switch / router.


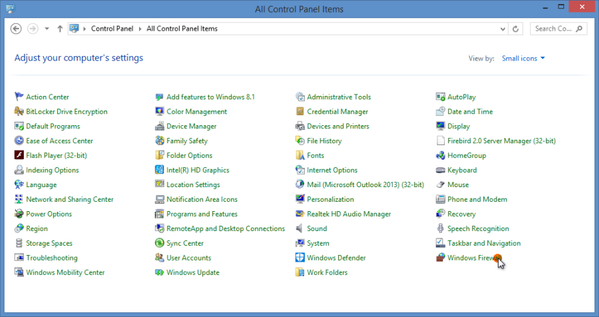
Step 2: Go to Control Panel > All Control Panel Items > Windows Firewall.
All Control Panel Items Window
Figure 1: All Control Panel Items Window


Step 3: The Windows Firewall window will be shown. On the left panel, select Allow an app or feature through Windows Firewall.
Select Allow an App or Feature Through Windows Firewall
Figure 2: Select Allow an App or Feature Through Windows Firewall


Step 4: Click Change Settings.

.

Note

Administrator's permissions are required to perform this step.

.

.

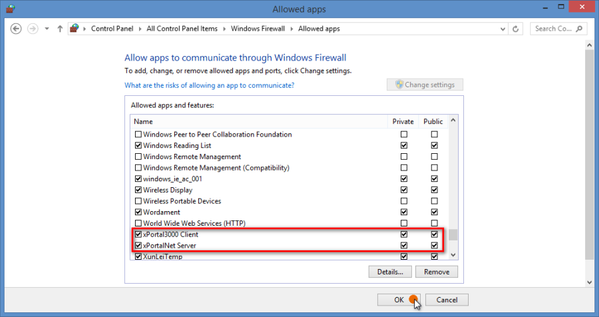
Step 5: The following window will be shown. Look for MicroEngine's software and check both the check boxes to allow the software to communicate through Windows Firewall on both Public and Private network connections.
The Allowed Apps Window
Figure 3: The Allowed Apps Window


Step 6: Click OK to allow the selected software to communicate through Windows Firewall.

.

.

  • Method 2: To prevent apps from being blocked by Windows Firewall by disabling / turning off Windows Firewall feature:

Step 1: Connect the controller and Server PC to a network switch / router.


Step 2: Go to Control Panel > All Control Panel Items > Windows Firewall.
The All Control Panel Items Window
Figure 4: The All Control Panel Items Window


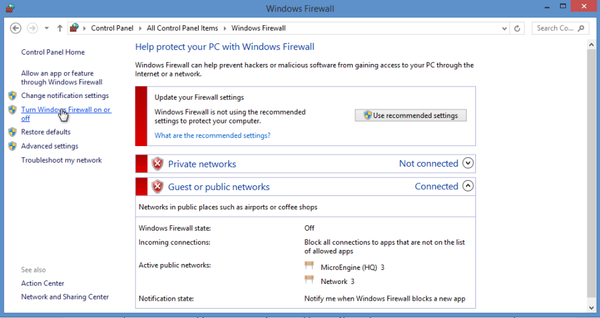
Step 3: The Windows Firewall window will be shown. On the left panel, select Turn Windows Firewall on or off.
Selecting Turn Windows Firewall On or Off
Figure 5: Selecting Turn Windows Firewall On or Off


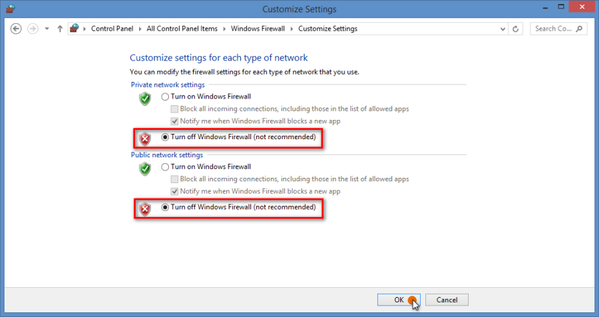
Step 4: The Customize Settings window will be shown. Check the Turn off Windows Firewall checkbox for both Private & Public network settings and click OK.
The Customize Settings Window
Figure 6: The Customize Settings Window
.

.

  • To assign static / fixed IP address for Server PC:

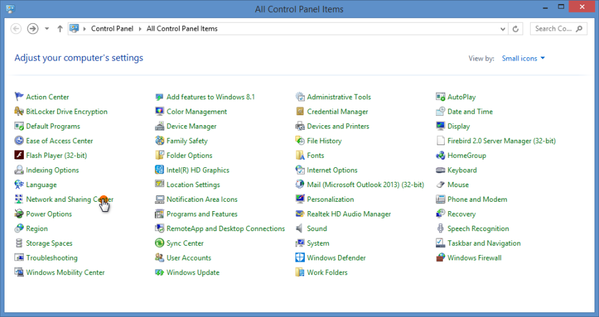
Step 1: Go to Control Panel > All Control Panel Item > Network and Sharing Center.
The All Control Panel Items Window
Figure 7: The All Control Panel Items Window


Step 2: Select network connection and left-click > Properties.


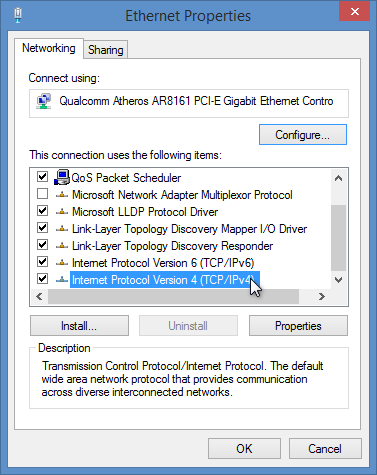
Step 3: The Ethernet Properties window will be shown, double-click on Internet Protocol Version 4 (TCP/IPv4).
The Ethernet Properties Window
Figure 8: Ethernet Properties Window


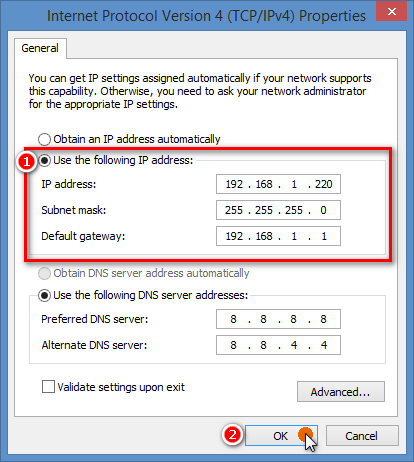
Step 4: The Internet Protocol Version 4 (TCP/IPv4) Properties window will be shown. Select Use the following IP address and configure the Server PC's IP address, Subnet mask and Default gateway. Click OK.

Figure 9: The Internet Protocol Version 4 (TCP/IPv4) Properties Window indicating Server PC IP address as 192.168.1.220

.

Note

  • The controller and Server PC's IP addresses are required to be configured with static IP addresses.
  • The communication port between Server and controller is of ÚDP type with default port number: 6268.
  • Ensure Server and controller's IP addresses are unique IP addresses in the network and that both IP addresses are not already occupied by another device / controller.
  • Ensure that the setting for Enhanced Network Encryption (AES 128) is configured to be the same as the controller setting in the xPortalNet software. If the setting on Web Diagnostic does not match with the setting in the software, the controller will also be shown as "Down"

.

.

  • To find unique static / fixed IP address for controller:

Step 1: Click Windows Start. Type "cmd" at the search box and press Enter to run the Windows Command Prompt.


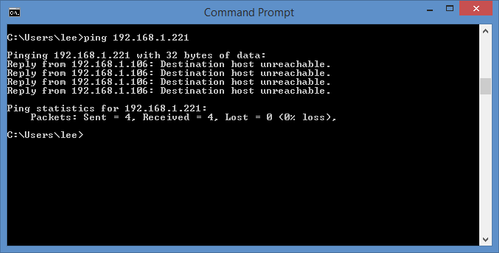
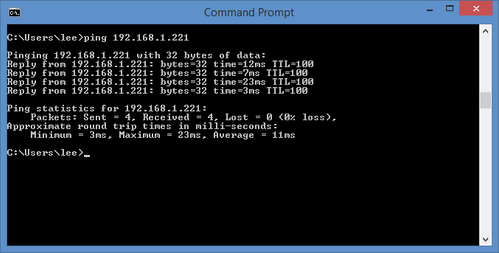
Step 2: Type "ping" command followed by prefered IP address and then press Enter. For example, type the following: ping 192.168.1.221
IP Address Available to Use
Figure 10: If Command Prompt Replies "Destination host unreachable", the IP Address is available for use.


IP Address Unavailable for Use
Figure 11: If the Command Prompt Replies as Above, the IP Address is occupied. Try to Ping Another IP Address

.

Note

Please ensure each controller and desktop PC have unique IP address cannot conflict or repeated in same IP range. It is can affected other controller or software performance.
Common Issues:

Often times after re-connecting to the network, the controller status may be shown as "Down" due to the controller and Server PC's IP addresses are automatically assigned as dynamic IP addresses (DHCP) in the network.

With dynamic IP address, a device can have different IP address every time it re-connects to the network or when the network detects that the IP address is already occupied by another device / computer.

So if the user found that the controller status is shown as "Down"; or the status is shown as "Up" and "Down" intermittently, check and ensure that both controller and Server PC's IP addresses are configured as static IP addresses.

Date Documentation:

24/4/2018 (Rev 1.0)

PROOF-READ

.

.


.

© MicroEngine Technology Sdn Bhd (535550-U). All rights reserved.