How to Enrol Fingerprint Template at the Legacy XP-GT Controller for Standalone Applications
| Problem (Issue) Statement: | How to enrol fingerprint template at the legacy XP-GT controller for standalone applications |
| Description: | The legacy XP-GT controller can support up to 5 fingerprint enrolments for each staff, subjected to a total amount of 3,500 fingerprint templates. The fingerprint enrolment can be used to replace card access to allow the controller to grant access through the respective door. This article will guide users on how to enrol fingerprint template at the legacy XP-GT controller for standalone applications. |
| Related Software: | NIL |
| Related Hardware: |
|
| System Application: | NIL |
| Symptom and Finding: | NIL |
| Cause: | For first time guide on how to enrol fingerprint template at the legacy XP-GT controller for standalone applications. |
| Solution: | Summary:
. . Step-by-step Guide:
Step 1: Ensure that the staff whose fingerprint is to be enrolled has already been added to the legacy XP-GT controller. Knowledge Base Link Users can refer to How to Add Card User at the XP-GT3500 or XP-GTR1500 Controller for the complete steps on how to add card user to the XP-GT controller. . .
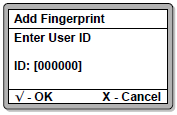
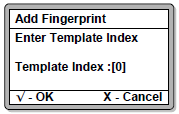
Step 1: At the controller, enter programming menu. Knowledge Base Link Users can refer to How to Enter into Programming Menu for Legacy XP-GT or XP-GTR Controllers for the complete steps on how to enter into programming menu. . . Step 2: Press 3 for Fingerprint Menu > 1 for Add Fingerprint. The Enter User ID screen will be shown. Users can then either flash the card near the keypad area or manually enter the User ID of the user. Press . Step 3: The Enter Template Index screen will then be shown. Users can enter a number from "1" to "5". If this is the first fingerprint template enrolled for this user, press "1". If this is the second fingerprint template enrolled for this user, press "2", and so on. Press . Step 4: The Enter Finger Index screen will be shown. Enter the finger index which represents the finger which will be used for the enrolment. Refer to the picture that follows for the correct finger index. Press .
. Step 5: The following screen will be shown to prompt the user to place his or her finger on the sensor surface. The sensor red LED light will be turned on. Please place the finger and apply light pressure on the sensor surface and wait for the finger to be detected. Wait until a confirmation message is shown to indicate that the fingerprint enrolment is complete. . Step 6: Your fingerprint will be enrolled into the controller memory shortly thereafter. Users can then enter another User ID to add another fingerprint, or press |
| Common Issues: | NIL |
| Porting Date: | 26/12/2019 |


PROOF-READ
.
.
.
© MicroEngine Technology Sdn Bhd (535550-U). All rights reserved.