Step 1: Press and hold the ColdStart button on the controller board.
Step 2: Turn off power supply.
Step 3: Turn on power supply.
Step 4: Release ColdStart button on the controller board after 3 seconds. The controller will respond with a long beep indicating that the ColdStart operation is in progress.
To install / add card user from XP-GT / XP-GTR controller for standalone controller application without connecting to any software:
Step 1: The following home screen will be shown after completing the ColdStart process.

Figure 1: LCD Home Screen
Step 2: Press asterisk key ({}) and enter the 6-digit default *MasterPIN.

Figure 2: Enter Default MasterPIN
Step 3: The following window will be shown to prompt users to change the MasterPIN. Enter the new MasterPIN which will be used to enter configuration menu from here onwards.

Figure 3: Enter a new MasterPIN
Step 4: The window will be prompt users to reconfirm the new MasterPIN. Re-enter the same MasterPIN to reconfirm.

Figure 4: Re-enter the new MasterPIN
Step 5: The following window will then be shown to indicate that the MasterPIN has been changed.

Figure 5: MasterPIN Updated Window
Step 6: The main menu layout will be shown as below. Press "2" to enter Database Menu.

Figure 6: Main Menu Layout
Step 7: The Database Menu will be shown. Press "2" to Add User.

Figure 7: Database Menu Layout
Step 8: The following window will be shown to prompt users to select the user type. Enter the key that corresponds to the correct user type. Press "√" to confirm.

Figure 8: Enter User Type Window
Step 9: At the following window, enter the user's card number. Press "√" to confirm.

Figure 9: Enter User ID Number Window
Step 10: At the following window, enter the TimeZone number which will grant the respective card user access for this door. Press "√" to confirm.

Figure 10: Enter TimeZone No. Window
Step 11: The following window will then be shown. Specify whether to allow 1:N fingerprint operation. Press "√" to confirm.

Figure 11: Allow 1:N Operation Window
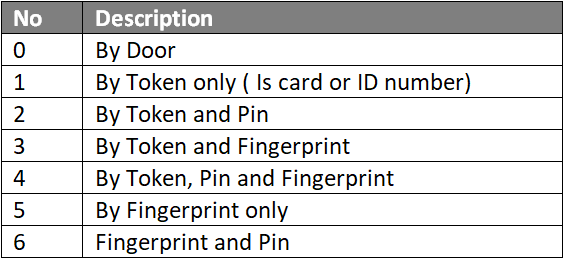
Step 12: At the Verification Mode window, select the verification mode for the card user. Press "√" to confirm.

Figure 12: Verification Mode Window
Step 13: The Allow Config Access window will be shown. Users can choose whether the new user is allowed access into the Configuration Menu. Make the necessary selection and press "√" to confirm.

Figure 13: Allow Config Access Window
Step 14: The following window will be shown to indicate that the new user has been successfully added to the controller's memory.

Figure 14: New User Installed Window
Step 15: To continue adding another new user, press "√" and repeat steps 8 to 13. To exit to the Database Menu, press "X".