How to Create Floor Zone and Floor Accessibility in xPortalNet HS PS v2.0 Software
Problem (Issue) Statement: | How to Create Floor Zone and Floor Accessibility at xPortalNet HS PS v2.0 |
Document No: | TIKB-000665 |
Categories: | Knowledge Base |
Type: |
|
Technical Level: | 1 |
Related Project Name: |
|
Site Deployment Date: |
|
Description: | A guide to create Floor Zone and Floor Accessibility in xPortalNet HS PS v2.0 software. |
Related Software: |
|
Related Hardware: |
|
System Application: |
|
Symptom and Finding: | NIL |
Cause: | For first time guide to create Floor Zone and Floor Accessibility in xPortalNet HS PS v2.0 software. |
Solution: | Summary:
. Note Ensure that the Connection, Controller, Door, Lift Panel and Floor Relay have been configured in xPortalNet HS PS v2.0 Server. . . Knowledge Base Link User can refer to How to Configure Lift Access in xPortalNet HS PS v2.0 Server Software Application to complete steps to configure the Connection, Controller, Door, Lift Panel and Floor Relay settings. . . Step-by-Step Guide:
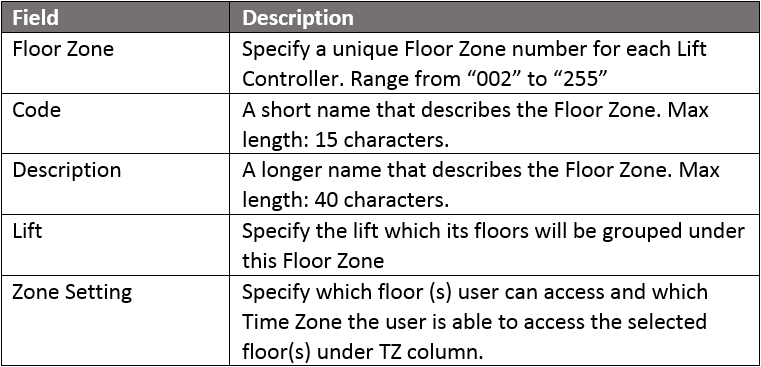
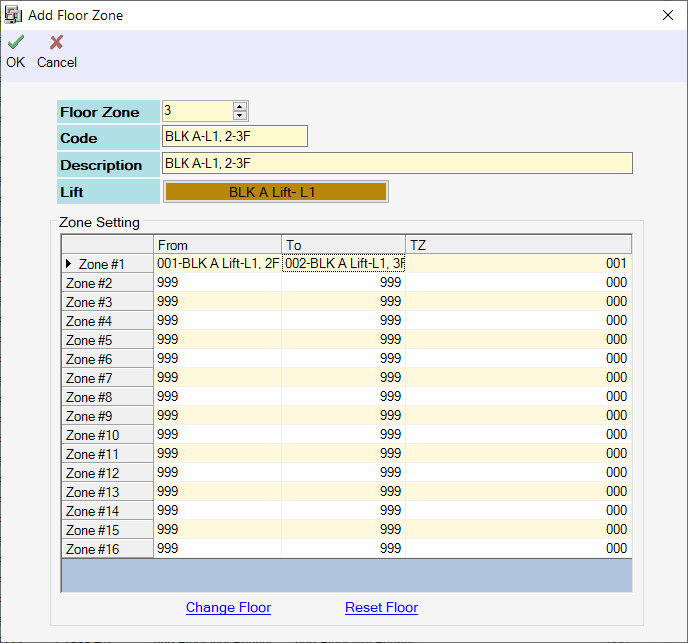
Step 1: Go to xPortalNet HS PS v2.0 Client > Data Setup > Access Data Setting > Floor Zone. The Floor Zone Setup window will be shown as below. . Step 2: Click Add to add new floor zone. The Add Floor Zone window will be shown. Fill up the floor zone information accordingly. Click OK to save the changes. .
. Step 3: Examples of floor zone setups are shown in screenshots that follow: .
. Step 4: The 2 screenshot examples above represent two different ways of configuring the Zone Setting selection. Example in Figure 3 specifies that user can only access one single floor and example in Figure 4 allow user to access multiple floors using the same floor zone. . Step 5: The following message window will be shown to indicate that Record Added. Click OK to continue. . .
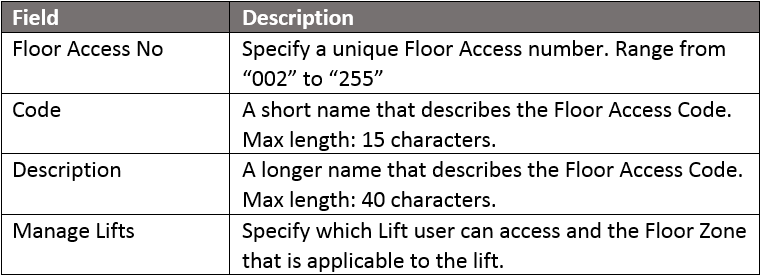
Step 1: Go to xPortalNet HS PS v2.0 Client > Data Setup > Access Data Setting > Floor Accessibility Setting. The Floor Accessibility Setup window will be shown as below. . Step 2: Click Add to add a new floor accessibility. The Add Floor Accessibility window will be shown. Fill up the floor accessibility information accordingly, Click OK to save the changes. .
. Step 3: The following message window will be shown to indicate that Record Added. Click OK to continue. |
Common Issues: | NIL |
Date Documentation: | 17/9/2020 (Rev 1.0) |


PROOF-READ
.
.
.
© MicroEngine Technology Sdn Bhd (535550-U). All rights reserved.