How to Configure Lift Access in xPortalNet HS PS v2.0 Server Software Application
Problem (Issue) Statement: | How to configure Lift Access in xPortalNet HS PS v2.0 Server software application |
Description: | A guide to configure Lift Access in xPortalNet HS PS v2.0 Server software application. |
Related Software: |
|
Related Hardware: |
|
System Application: |
|
Symptom and Finding: | NIL |
Cause: | For first time guide to configure Lift Access in xPortalNet HS PS v2.0 Server software application. |
Solution: | Note XP-QNET controller is able to support up to a maximum of 5 doors . . Summary:
. Step-by-Step Guide:
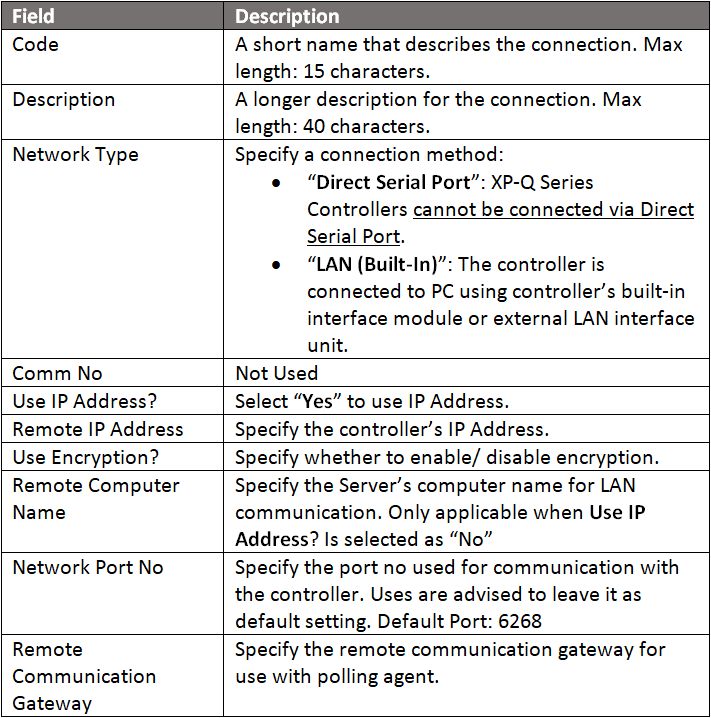
Step 1: Ensure that the xPortalNet HS PS Services is running. . Step 2: Go to xPortalNet HS PS Server > Server Admin > Connection Setup. . Step 3: Click Add to add a new connection. The Add Connection window will be shown. Fill in all connection information accordingly and click OK to save the changes. .
. Step 3: The following message window will be shown to indicate that the Record is Added. Click OK to continue. . .
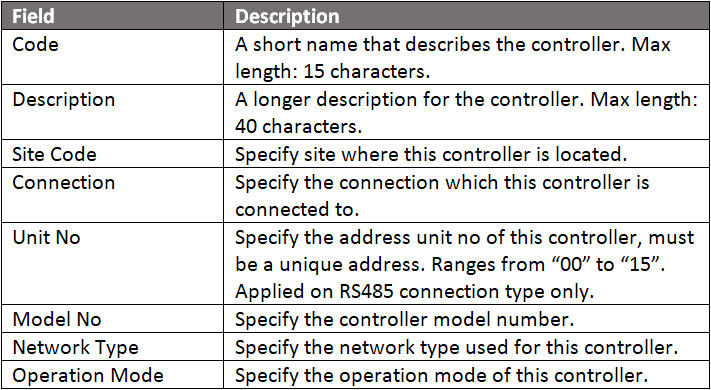
Step 1: For Controller setup, go to Server Admin > System Device Setup > Connection Setup. The Controller Setup window is shown as below: . Step 2: Click Add to add a new controller. The Add Controller window will be shown as below. Fill in controller information accordingly and click OK to save the changes. .
. Step 3: The following message window will be shown to indicate that the Record is Added. Click OK to continue. . .
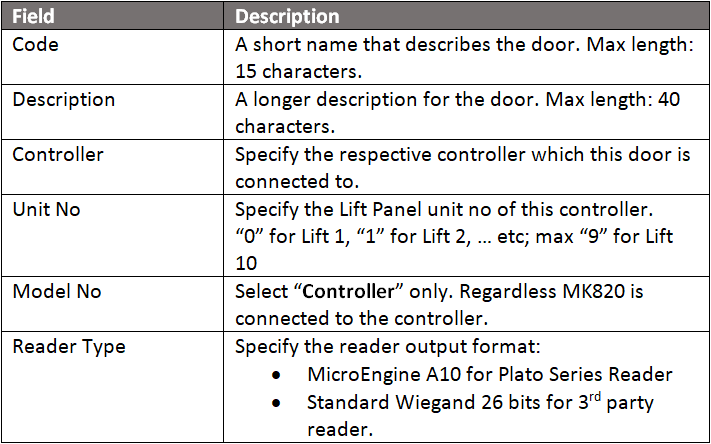
Step 1: For Door Setup, go to Server Admin > System Device Setup > Door. The Door Setup window shown as below: . Step 2: Click Add to add a new door. The Add Door window will be shown as below. Fill in door information accordingly and click OK to save the changes. .
. Step 3: The following message window will be shown to indicate that the Record is Added. Click OK to continue. . .
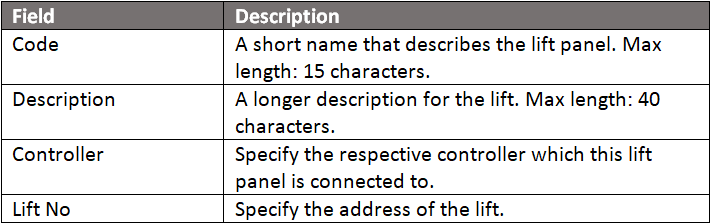
Step 1: For Lift Panel Setup, go to Server Admin > System Device Setup > Lift Panel. The Lift Setup window will be shown as below. . Step 2: Click Add to add a new Lift Panel. The Add Lift window will be shown. Fill in all Lift Panel information accordingly and click OK to save. .
. Step 3: The following message window will be shown to indicate that the Record is Added. Click OK to continue. . .
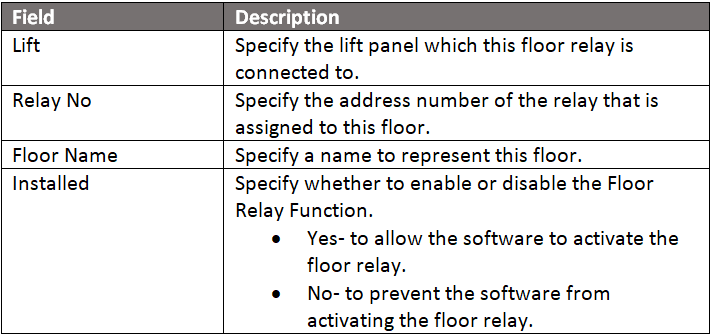
Step 1: For Floor Relay Setup, go to Server Admin > System Device Setup > Floor Relay. The Floor Relay Setup window will be shown as below. . Step 2: Click Add to add floor relay. The Add Floor Relay window will be shown. Fill in all floor relay information accordingly. Click OK to save the changes.
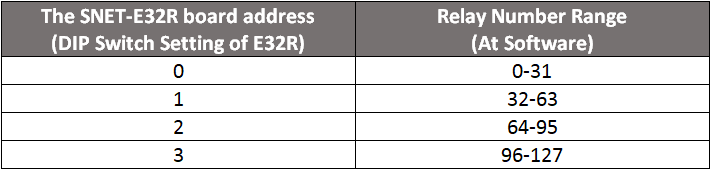
. Step 3: The following message window will be shown to indicate that the Record is Added. Click OK to continue. . Step 4: Repeat step 2 to continue adding the remaining new floor relay number as required. . Note The table below shows the relay number scheme to be followed. . . Step 5: User can continue to create Floor Zone and Floor Accessibility at xPortalNet HS PS Client. |
Common Issues: | NIL |
Date Documentation: | 15/9/2020 (Rev 1.0) |


PROOF-READ
.
.
.
© MicroEngine Technology Sdn Bhd (535550-U). All rights reserved.