How to Bulk Write Card Number for Mifare Cards in xPortal3000 Software
| Problem (Issue) Statement: | How to Bulk Write Card Number for Mifare cards in xPortal3000 software |
| Description: | xPortal3000 software also allows users to perform bulk write operations for large number of Mifare cards to make the enrollment process simpler and faster. |
| Related Software: |
|
| Related Hardware: | NIL |
| System Application: | NIL |
| Symptom and Finding: | NIL |
| Cause: | For first time guide on how to Bulk Write Card Number for Mifare cards in xPortal3000 software. |
Warning!
. . Summary:
. Step-by-step Guide:
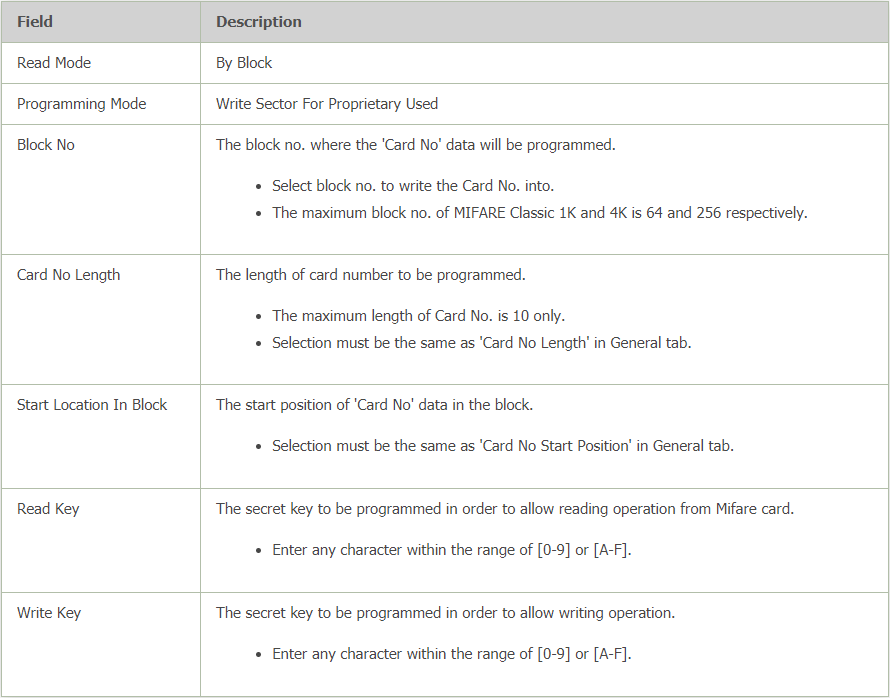
Step 1: Launch xPortal3000 Client > Control Panel > System Properties. The System Properties window will be shown. Click Modify > Mifare Card Options tab. . Step 2: The Edit System Properties window will then be shown. Refer to the following table for the settings to be configured. Click OK to save the changes made. .
. .
Step 1: Go to xPortal3000 Client > Staff Record > Add. The Add Staff Detail window will be shown.
. Step 2: Users can then proceed to configure the other relevant fields for this staff record. Click OK to save the changes. . .
Knowledge Base Link Check and ensure that the Programming Reader is properly plugged in and detected by the PC. Users may refer to How to Connect Legacy Programming Reader XP-C80KL to xPortal3000 Software to Program Mifare Card for the complete steps to connect the Mifare Programming Reader to the PC. . . Step 1: Back at the Staff Detail Setup window, click on the Mifare Card Programming icon > Reader Settings. . The Reader Settings window will then be shown. Select the Serial Port number to which the Mifare Programming Reader is connected to the PC. Click OK to save the changes. . Note The Reader Settings configuration highlighted in this section only needs to be configured once before the use of the Mifare Programming Reader. . .
Step 1: Go to xPortal3000 Client > Staff Record. The Staff Detail Setup window will be shown. Click on the Mifare Card Programming icon > Bulk Write Card. . Step 2: The Select User window will be shown. Filter the staff records which the Card Number is to be programmed and click OK to proceed. . Step 3: The Bulk Write Card window will then be shown. Click Start to start the card programming . Knowledge Base Link Users may refer to for the complete information on the Bulk Write Card window. . . Step 4: The following window will be shown to prompt users to place the card to be programmed on the programmer. . Step 5: The software will then begin to program the cards. Once the card is successfully enrolled, the following message window will be shown to prompt users to place the next card.
. Step 6: Place the next card to be enrolled. Repeat Step 5 to enroll all remaining cards. Once all cards have been enrolled, the following window will be shown. Ensure that all card enrolment statuses are shown as "Success". . Step 7: The software will then show the following message window to prompt users to save the writing process. Click Yes to save the results. | |
| Common Issues: | NIL |
| Porting Date: | 5/7/2019 |


PROOF-READ
.
.
.
© MicroEngine Technology Sdn Bhd (535550-U). All rights reserved.