How to Physically Clean Internal Computer Component Parts
- Tan Rong Wei (Unlicensed)
Problem (Issue) Statement: | How to physically clean internal computer component parts |
Description: | Cleaning internal computer parts enhances ventilation for the PC and help keep a steady airflow into the computer to keep all components cool and avoid overheating issues. Even a small problem in the internal component can affect the performance of the computer. Hence, it is a no-brainer that the motherboard needs to be well-maintained and looked after. Here are a few tips you can use when cleaning internal components. |
Related Software: | NIL |
Related Hardware: |
|
System Application: | NIL |
Symptom and Finding: | NIL |
Cause: | For first time guide to physically clean internal computer component parts. |
Solution: | Summary:
.
. Note Internal components need to be cleaned since they need to remain dust-free in order to remain properly cooled, to prevent their lifespan from becoming significantly reduced. Peripherals, on the other hand, should be kept clean for mostly hygienic reasons. . . Caution! You can use a vacuum cleaner to suck up dirt, dust, or hair around the computer. However, do not use a vacuum inside your computer as it generates static electricity that can damage your computer. If you need to use a vacuum cleaner inside your computer, use a portable battery powered vacuum, air blower or compressor. . . Step-by-step Guide:
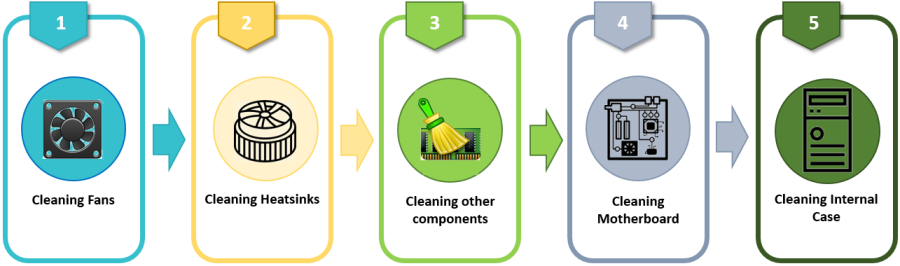
Step 1: Turn off power supply for the computer and remove the left side panel by unscrewing the screws on the back. Some cases come with screws that include special rubber or plastic caps to allow the user to remove them by hand. . Step 2: Hold the fins of the computer fan (case fan, graphics fan, CPU fan and power supply unit fan) in place using your fingers. . Step 3: Use air blower, cleaning brush, compressed air or portable vacuum cleaner to remove loose dust for computer fan (case fan, graphics fan, CPU fan and power supply unit fan). Be extra careful while doing this as the high air pressure forcing the fan to spin might damage the fan bearing. . Types of fans found in computer.
.
. .
Step 1: Disconnect the cooler from the motherboard and take it out from the case. Tips Push pins are the most common way of keeping a CPU cooler in place today, if you have a different one, be sure to check the manufacturer's site or the guide on how to properly remove it. . . . Step 3: Brush out any remaining dust from the heatsink using an old brush. . Step 4: Use isopropyl alcohol pad to get rid of any dust that is still stuck to the heatsink. . Components in a Computer that Uses Heatsinks The components that generate the most heat in computer are the CPU (central processing unit) and video card (if your computer has one). They always have some forms of cooling, usually a fan. Other components that may have a heat sink include the north bridge, south bridge, and memory. It is also not uncommon to find heat sinks on other expansion cards and hard drives. . . Step 5: After detaching the heatsink, start by removing any excess thermal paste from the bottom of the heat sink, from the top of the chip. This can be done with isopropyl alcohol pad cloth. . Step 6: Once the CPU socket and surrounding area have been properly cleaned, apply some fresh thermal paste directly onto the top center of the chip before re-installing the heatsink fan unit for the processor. . .
Step 1: Internal component that require cleaning includes the RAM and power supply unit. . Step 2: Using portable vacuum cleaner, air blower or cleaning brush, remove the dust on component surface . Step 3: Caked–on dust can be rubbed away with isopropyl alcohol using either cloth or pad. . Step 4: Dirt on RAM pins can make computers work slower, hangs often, and even cause the computer to malfunction. Use a pencil eraser on the pin surface to clean them properly. . Step 5: Use compressed air or blow air tool to clean the corresponding RAM slots on the motherboard. . Step 6: Take the cleaned component and carefully reinstall them back and make sure they are seated correctly. . .
Step 1: Use a portable vacuum or air blower to remove the dirt and dust particles on the motherboard. Use a cleaning brush if required. . Step 2: Use isopropyl alcohol pad to clean deeply the motherboard. This will remove any sticky or difficult-to-reach particles which couldn't be eliminated with the portable vacuum cleaner or air blower. . Step 3: Allow the motherboard to dry completely before reinstalling and powering on the computer again. . .
Step 1: Finally, don't forget to clean out the internal parts of the case and all connection ports. . Step 2: Use cleaning cloth and air blower to remove the dirt and dust particles. . Step 3: Optional, organized the cables. Begin by disconnecting all cables that need to be tied. Use a cable tie to make neat all the cables before re-connecting them to their respective ports. . Step 4: Close back the side panel. |
Common Issue | NIL |
Date Documentation: | 4/5/2020 (Rev 1.0) |


PROOF-READ
.
Related Articles.
Containing the label "system-maintenance"
Filter by label
There are no items with the selected labels at this time.
.
.
Related content
© MicroEngine Technology Sdn Bhd (535550-U). All rights reserved.