How to Configure QR Code Settings in xPortalNet Software
| Problem (Issue) Statement: | How to configure the QR Code settings in xPortalNet software. |
| Description: | This article will guide a technical user or system admin to configure the QR Code settings in xPortalNet software. |
| Related Software: |
|
| Related Hardware: |
|
| System Application: | NIL |
| Symptom and Finding: | NIL |
| Cause: | For first time guide to configure the QR code settings in xPortalNet software. |
| Solution: | Pre-requisites / Requirements
Summary:
Step-by-step Guide:
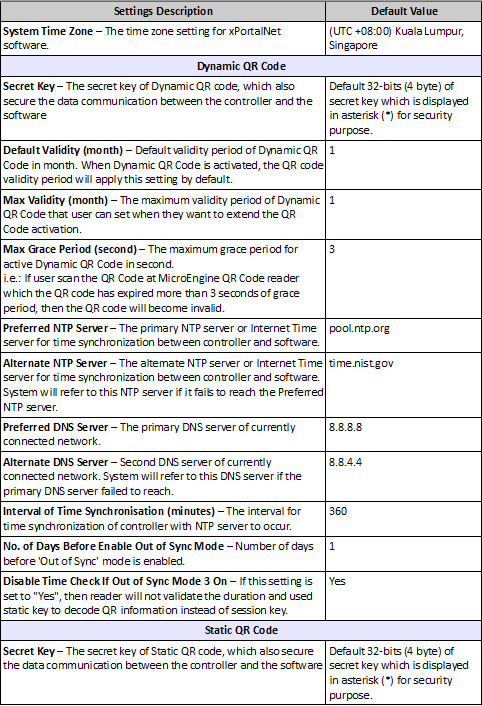
Step 1: Login to xPortalNet Server software. Then, go to Server Admin > System Properties. Step 2: The System Properties window will be shown. Click Modify. Step 3: The Edit System Properties window will then be shown. Go to Miscellaneous > QR Code. Step 4: Configure the QR Code settings according to the table as shown below, wherever necessary.
. Tips For more NTP server options, open Control Panel > Date and Time or click on your PC time from windows taskbar to open the Date and Time settings. In Date and Time window, go to Internet Time tab. Click 'Change settings...'. In Internet Time Settings window, click on the drop-down arrow for Server field to view more Internet Time server options. You can try any one of the servers for NTP server settings in xPortalNet software. . . Additional Tips Enter “ipconfig -all” command in Command Prompt to view the DNS server of currently connected network. . . Step 5: Save the QR Code settings by clicking OK. Step 6: The “Record Updated!” message box will be shown. Click OK to continue. Step 7: Remember to download the door parameters to controller to apply the changes after configured the QR Code settings. . Knowledge Base Link Users may refer to How to Send or Download Data to the Controller for the complete steps to send door settings to controller. Step 8: After downloading the door parameters, retrieve the door parameters to makes sure that the controller(s) are updated with the latest QR settings. (go to xPortalNet Client > Device Comm > Retrieve Device Setting) |
| Common Issues: | NIL |
| Documentation Date: | 17/05/2020 (Rev 1.0) |


.jpg?version=1&modificationDate=1591085190611&cacheVersion=1&api=v2&width=800&height=596 "Edit System Properties Window - to Save the QR Code Settings")
.jpg?version=1&modificationDate=1591085190342&cacheVersion=1&api=v2&width=774&height=660 "Record Updated Message")
.jpg?version=1&modificationDate=1591085189983&cacheVersion=1&api=v2&width=774&height=660 "Please go to xPortalNet Client Software to Download the Settings Message")
PROOF-READ
.
.
.
© MicroEngine Technology Sdn Bhd (535550-U). All rights reserved.