Step 1: Ensure that xPortalNet Services is running.
Step 2: Go to xPortalNet Server > Server Admin > System Properties > Modify.
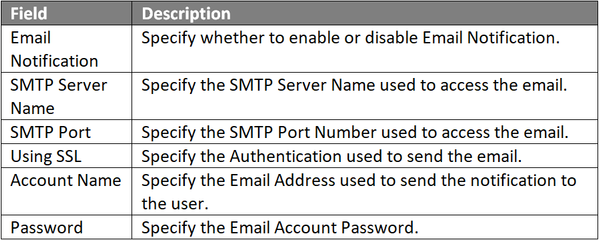
Step 3: The Edit System Properties window will be shown. Click Email & SMS tab. Fill up all information accordingly at Email Notification section. Click OK to continue.

Figure 1: Email and SMS Tab in Edit System Properties Window
The following screenshot shows an example of an email notification setup. This setting can be used for Gmail account.

Figure 2: Example of Email Notification Setup
Step 4: Click Test Sending Email to test and ensure that the configuration on Email Notification are done correctly.
Step 5: If the configuration is done correctly, the software will prompt the following message window to indicate that the "Email was sent successfully."

Figure 3: Email was Sent Successfully Window
Step 6: Sign into the email account registered at Email Notification configuration settings and verify that the email inbox received the email from xPortalNet, as shown below.

Figure 4: Email Notification Received from xPortalNet Comm Service
Step 7: Click OK and Close to exit from System Properties window.
.
.
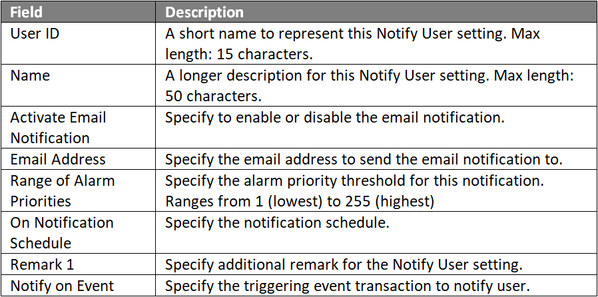
Step 1: Go to xPortalNet Server > Server Admin > Notify User.

Figure 5: Notification Setup Window
Step 2: Click Add to add a new notification. The Add Notification Window will be shown. Fill up all information accordingly. Click OK to save the changes.

Figure 6: Add Notification Window
Step 3: The following message window will be shown to indicate that the Record is Updated. Click OK to continue.

Figure 7: Record Updated Window
Step 4: Click Close to exit the Notification Setup window.
Step 1: To trigger the specified event transaction for testing purposes.
Step 2: At the Latest Event List, ensure that the transaction of Send Email OK is logged as shown below.

Figure 8: Send Email OK Transaction Recorded in Latest Event List
Step 3: Check in the email inbox to confirm receiving the Email Notification for the triggering of the event transaction as shown below.

Figure 9: Email Inbox Showing the Email Notification