How to Setup Lift Access System using XP-QNET Controller
Problem (Issue) Statement: | How to setup Lift Access System Using XP-QNET controller? |
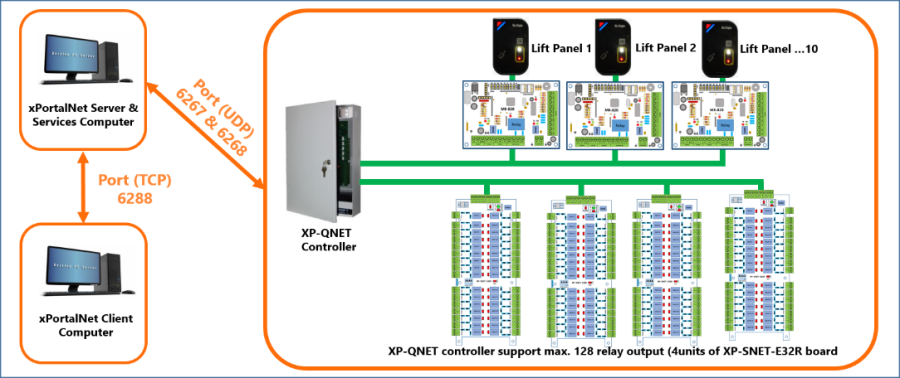
Description: | A guide to setup Lift Access System using XP-QNET controller. . For Lift access system application, the XP-QNET controller is used as Lift Controller and is connected to XP-SNET-E32R extension board for integration with Lift's Call Operation Panel to control the lift call buttons. The XP-MK820 reader interface module will be connected to Plato-Q81MS reader in support of multi-card types as access credential such as QR code, Mifare classic and Mifare Desfire cards. . Each XP-QNET controller is able to support up to a maximum of 10 number of Lift panels and a total relay output of 128. |
Related Software: |
|
Related Hardware: |
|
System Application: |
|
Symptom and Finding: | NIL |
Cause: | For first time guide to setup Lift Access System using XP-QNET controller. |
Solution: | Summary:
Step 1: To configure XP-QNET controller to function as Lift Controller. Knowledge Base Link Users may refer to How to Assign XP-QNET Controller to Function as Lift Controller to complete this configuration. . .
Step 1: To assign a static IP Address to XP-QNET controller via web diagnostic. Knowledge Base Link Users may refer to How to Configure XP-SNET Controller's IP Address Using Web Diagnostic to complete this configuration. . .
Step 1: XP-QNET controller has two ways to connect to the reader. For connection to Plato QR Reader, this can be directly connected to the controller. Alternatively, users should use the XP-MK820 Reader interface module to connect to third-party readers or facial recognition terminal devices. Knowledge Base Link Users may refer to /wiki/spaces/MKB/pages/1635844105 to complete this configuration. . . Note If the application involves connecting with third party reader or facial recognition terminal devices, then users must use XP-MK820 Reader Interface Module for the application. . . Step 2: To assign Plato QR reader address or XP-MK820 Address Jumper Setting. Knowledge Base Link Users may refer to How to Configure Plato QR Reader Address Settings or How to Configure Address Jumper Setting for XP-MK820 Address for Lift Access Application to complete these configuration settings. . .
Step 1: To configure output relay jumper settings for XP-SNET-E32R. Knowledge Base Link Users may refer to How to Configure Jumper Settings for XP-SNET-E32R Output Relays when Connecting with XP-QNET Controller to complete the configuration settings. . . Step 2: To configure address number on the XP-SNET-E32R extension board. Knowledge Base Link Users may refer to How to Configure Address Unit No on XP-SNET-E32R Extension Board to complete this configuration setting . . Step 3: To connect the XP-SNET-E32R extension to XP-QNET controller. Knowledge Base Link Users may refer to How to Connect XP-QNET Controller to XP-SNET-E32R Extension Board for Lift Masking System Application to complete the cable termination. . . Step 4: To connect the Elevator COP buttons to XP-SNET-E32R extension board. Knowledge Base Link Users may refer to How to Connect Elevator COP Buttons to XP-SNET-E32R Extension Board to complete the cable termination. . .
Step 1: Launch xPortalNet HS PS v2.0 Server. . Step 2: To add new connection, controller, door, lift panel and floor relays. Knowledge Base Link Users may refer to How to Configure Lift Access in xPortalNet HS PS v2.0 Server Software Application to complete this configuration setting . .
Step 1: Launch xPortalNet HS PS v2.0 Client. . Step 2: To create new floor zone & floor accessibility. Knowledge Base Link Users may refer to How to Create Floor Zone and Floor Accessibility in xPortalNet HS PS v2.0 Software to complete this configuration setting . . . Step 4: During testing, create a new card user and assign door accessibility & floor accessibility for complete testing of the configuration. |
Common Issues: | NIL |
Date Documentation: | 21/9/2020 (Rev 1.0) |
PROOF-READ
.
.
.
Related content
© MicroEngine Technology Sdn Bhd (535550-U). All rights reserved.
