How to Install New User in Legacy XP-GT or XP-GTR Series Controllers without Using the Card
| Problem (Issue) Statement: | How to install new user in legacy XP-GT or XP-GTR series controllers without using the card |
| Description: | The XP-GT / XP-GTR controller can be used to provide access via the token type of Mifare / proximity cards. Alternatively, the controller can also accept ID Number as verification token to grant door access. There are 4 available options of user type when adding a new user to the legacy XP-GT / XP-GTR controller:-
This article will guide users on how to install new user into the XP-GT / XP-GTR controller by using ID Number only without requiring the card. |
| Related Software: |
|
| Related Hardware: |
|
| System Application: | NIL |
| Symptom and Finding: | NIL |
| Cause: | For first time guide on how to install new user into XP-GT / XP-GTR controller using ID Number only. |
Summary:
Warning!
. . Step-by-step Guide:
Step 1: Enter the Programming Menu for the XP-GT / XP-GTR controller. Press 2 for Database Menu > 2 for Add User. The Enter User Type screen will be shown by the controller. Select [1] for the User Type of ID Number. Press " . Step 2: The Enter User Number screen will then be shown. Enter the ID Number and press " . Step 3: The Enter TimeZone No. screen will be shown. Enter the TimeZone No. to be assigned to this user to indicate which time zone setting can he gain access through the door. Press " . Note There are 2 default TImeZone settings which users can use:-
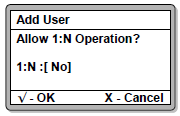
. . Step 4: If the controller is a unit with fingerprint reader module, the Allow 1:N Operation? screen will be shown to prompt users to select whether to allow one-to-many fingerprint matching verification for this particular user. Select [Yes] to be able to use the fingerprint as a form of verification token. Press " . Step 5: The Enter Verification Mode screen will then be shown. Select [1] for verification by token only (which is the specified to be ID Number). Press " . Explanation There are 7 verification modes to choose from:-
Note that fingerprint verification options are only available to controller with fingerprint reader module. . . Step 6: The following screen will be prompted by the controller to indicate that the new user has been installed successfully. Press " . Step 7: Repeat steps 1 to 6 to add another new user, or press "x" to return to the Database Menu. | |
| Common Issues: | NIL |
| Porting Date: | 17/10/2019 |


PROOF-READ
.
.
.
© MicroEngine Technology Sdn Bhd (535550-U). All rights reserved.