Summary:
Step-by-step Guide:
SQL Server Express 2014 Introduction:
Step 1: There are some limitations to SQL Server Express 2014 Edition that you should understanding. These limitations include:
- Databases built with Express Edition are limited to 10GB in size.
- Express Edition does not offer the database mirroring, log shipping or publication merging features offered in the larger product.
- SQL Server 2014 Express Edition requires a minimum of 6GB disk space, and 4GB of RAM.
- Supported operating systems include Windows 10, 7 and 8, Windows Server 2008 R2 and Windows Server 2012.
Pre-Requisite installation:
Step 1: Users are required to enable Microsoft .Net Framework 3.5 SP1 or download and install Microsoft .Net Framework 4.0.
Download the SQL Server Express Installer:
Step 1: Click here to download the Microsoft SQL Server Express 2014.
Step 2: Select the appropriate language and click Download.

Figure 1: Downloading Microsoft SQL Server 2014 Express Edition
Step 3: Choose whether to download the 32-bit or 64-bit version of SQL Server depending on the operation system specification. Click Next to continue.

Figure 2: Selecting the Correct Version to Download
Step 4: Click here for more information on the download process.
Step 1: Locate the downloaded setup file for Microsoft SQL Server Express 2014.

Figure 3: The Downloaded Setup File in the Download Folder
Step 2: Run the SQLEXPRADV_x64_ENU.exe setup file. It will extract the file required for the setup process, which may take up to 5 or 10 minutes.

Figure 4: Microsoft SQL Server 2014 Express Extraction Process
Step 3: The extraction window will then disappear after the extraction process completes. Wait until the following window is shown.

Figure 5: SQL Server 2014 Processing Current Operation Message
Step 1: The SQL Server Installation Center window (Installation tab) will then be shown. Click New SQL Server stand-alone installation or add features to an existing installation to continue the process.

Figure 6: SQL Server Installation Center Window under Installation Tab
Step 2: The "Please wait while Microsoft SQL Server 2014 Setup processes the current operation" message will be shown again.

Figure 7: "Please Wait While Microsoft SQL Server 2014 Setup Processes the Current Operation" Message Window
Step 3: The License Terms window will then be shown. Tick the "I accept the license terms." Checkbox and click Next to continue.

Figure 8: License Terms Window
Step 4: At the Global Rules window, the Setup application will run multiple checks for rules during the installation process. If a rule check fails, the setup application will provide the corrective measures to be taken so that the installation can proceed.

Figure 9: Global Rules Window
Step 5: The Microsoft Update window will then be shown. Tick the check box on "Use Microsoft Update to check for an update" and click Next.

Figure 10: Microsoft Update Window
Step 6: Next, the Install Setup Files window will be shown. Wait for the installation process to finish.

Figure 11: Install Setup Files Window
Step 7: At the Feature Selection window, users can customize the SQL
Server feature to be installed in the PC system.

Figure 12: Feature Selection Window
Step 8: The Instance Configuration window will then be shown. Select "Named Instance" and name the database accordingly. Click Next.

Figure 13: Instance Configuration Window
Step 9: If a "Please Wait..." message window appeared, please be patient and wait for the application to sort the process out.

Figure 14: "Please Wait…" Message Window
Step 10: At the Server Configuration window, users are strongly advised not to play around with these setting and leave them in the default settings. Click Next.

Figure 15: Server Configuration Window
Step 11: The Database Engine Configuration window will then be shown. Specify the Database Engine authentication mode as Mixed Mode, key-in the password for the Mixed Mode authentication, and add the current user as administrator. Click Next to continue.

Figure 16: Database Engine Configuration Window
- Authentication Mode, select Mixed Mode
- To specify the password for the SQL Server system administrator (sa) account: Enter password and confirm password.
- To specify SQL Server administrators: select Add Current User
Step 12: At the Reporting Services Configuration window, select Install and configure. Click Next.

Figure 17: Reporting Services Configuration Window
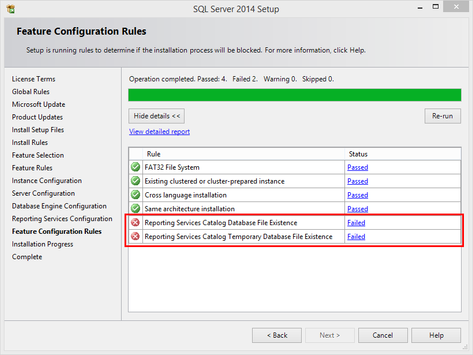
Step 13: At the Feature Configuration Rules window, wait until all the operations are passed, and then click Next.

Figure 18: Feature Configuration Rules Window
Step 14: The Installation Progress window will then be shown to indicate the installation progress. Wait for the installation process to finish.

Figure 20: Installation Progress Window
Step 15: Upon completing the installation, click Close to exit from the SQL Server Express 2014.

Figure 21: Completion of the Installation
Step 16: Restart the computer to allow the SQL Server database to launch.