How to Configure Partitioning Settings in xPortalNet Software


Problem (Issue) Statement:

How to Configure Partitioning Settings in xPortalNet Software

Description:

User can use this setting to differentiate the access levels of System User in accessing the system.

Related Software:

xPortalNet v1.5.0.130 or higher

Related Hardware:

NIL

System Application:

Door Access System

Symptom and Finding:

NIL

Cause:

For first time guide to configure the Partitioning Settings.

Solution:

Warning!

  • Users are not recommended to run any xPortal software in Windows XP operating system as the system is unstable

  • Users are also advised to stop the xPortal Services before shutting down the Server PC to prevent any missing transaction issues.

.

.

Summary 

.

Step-by-step Guide: 

  • To Configure the Partitioning Settings.

In these steps, user will be guided to create new Partitioning Settings


Step 1: Login to xPortalNet Client. 


Step 2: Open Partitioning Settings Setup. Go to Data Setup > System Setting > Partitioning Settings.


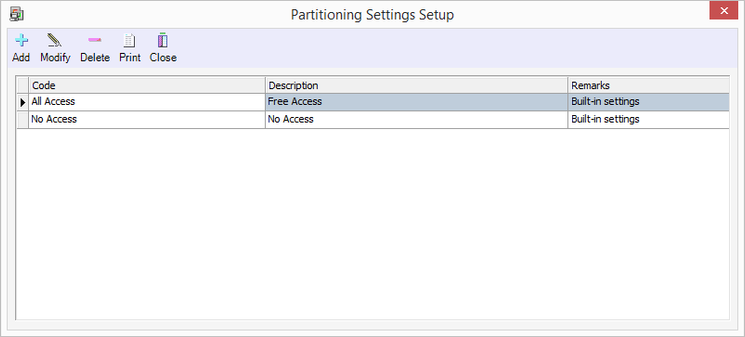
Step 3: The Partitioning Settings Setup window will be shown.


Step 4: Click Add to add new Partitioning Settings.
Partitioning Settings Setup Window
Figure 1: Partitioning Settings Setup Window.


Step 5: Add Partitioning Settings window will be shown.
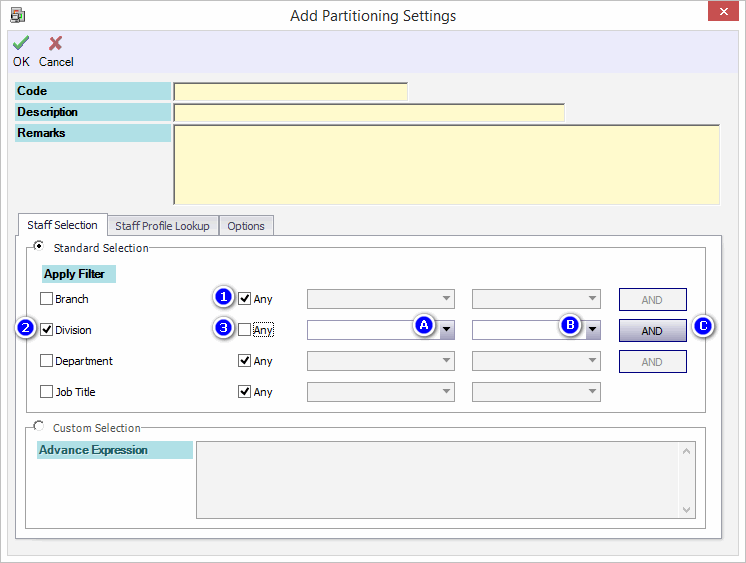
Staff Selection WindowFigure 2: Staff Selection Window.


  • Fill up the Code, Description and Remarks for this Partitioning Settings.

  • Staff Selection is to filter out which Staff Record can be viewed under this Partitioning Settings.

    1. Checked the "Any" box to apply any Staff Selection.

    2. Checked the Branch, Division, Department or Job Title box to apply the Staff Selection filter.

    3. Unchecked the "Any" box to select particular Staff Records.

      1. Select comparison operator for this filter.

      2. Select value for comparison.

      3. Select the AND or OR operations for this filter.

Operations Info

  • The AND operator displays a record if all the conditions separated by AND is TRUE.
  • The OR operator displays a record if any of the conditions separated by OR is TRUE.


Step 6: Click Staff Profile Lookup tab for the next configuration.
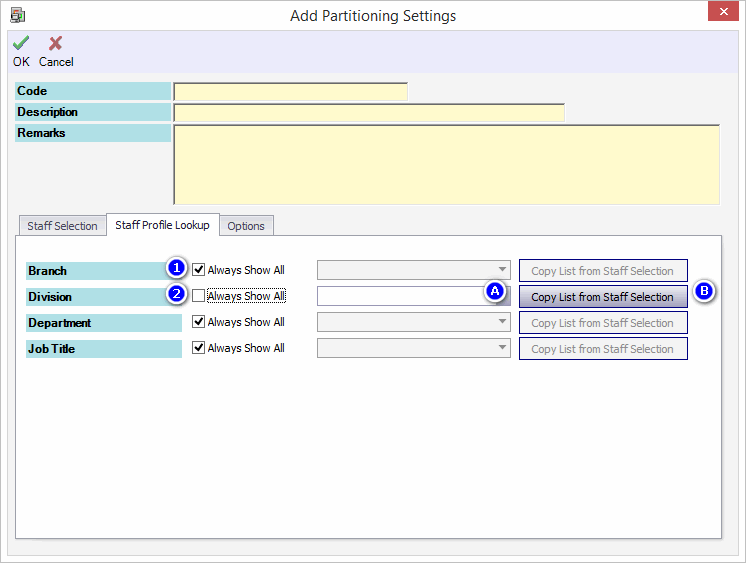
Staff Profile Lookup WindowFigure 3: Staff Profile Lookup Window.


  • Staff Profile Lookup is to filter out which Staff Record can be lookup under this Partitioning Settings.

    1. Checked the "Always Show All" box to show all records during profile lookup.

    2. Unchecked the "Always Show All" box to filter profile lookup by Branch, Division, Department or Job Title. 

      1. From the drop-down list menu, select the correct value accordingly.

      2. Click Copy List from Staff Selection for similar settings to be applied.


Step 7: Click Options tab for the next configuration.

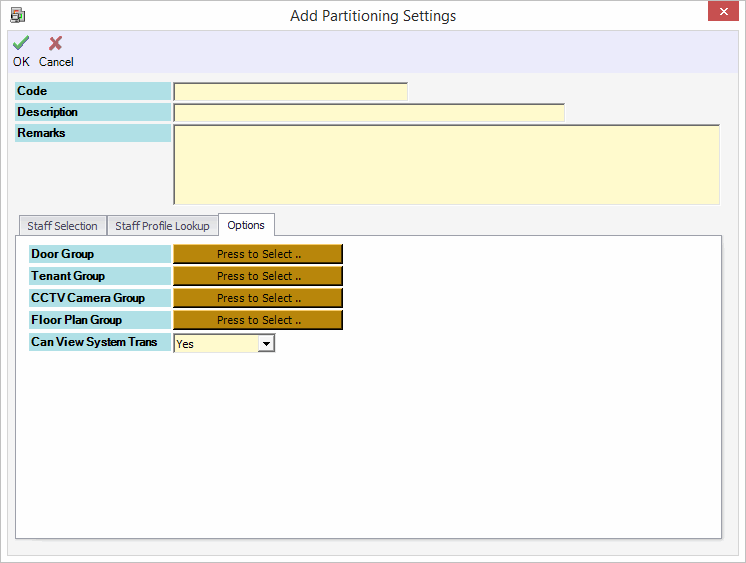
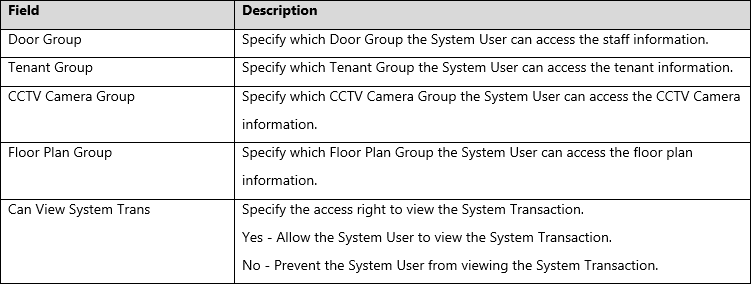
  • Specify the following field according to your preferences.

Options WindowFigure 4: Options Window.

Options Field Description
Table 1: Options Field Description.


  • To Assign the Partitioning Settings for the System User.

In these steps, user will be guided to assign the created Partitioning Settings to System User.


Step 1: Login to xPortalNet Server.


Step 2: Open System User. Go to Server Admin > System User.


Step 3: System User Setup will be shown.


Step 4: Add new System User or Modify existing records.


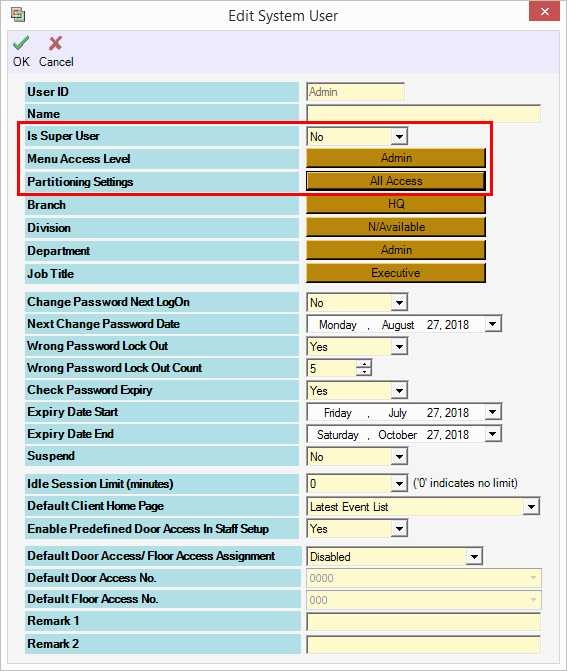
Step 5: Configure the System User as following:

  • Is Super User field must be "No".

  • Menu Access Level cannot be "SuperUser". Please select other access level.

  • Assign the Partitioning Settings for this System User.

System User Window
Figure 5: System User Window.


Step 6: Click OK to confirm and save the changes.


Step 7: Run xPortalNet Client by using System User account with specific Partitioning Settings to view the access level assigned.

Document Date

26/07/2018 (Rev 1.0)

PROOF-READ

.

.


.

© MicroEngine Technology Sdn Bhd (535550-U). All rights reserved.