.
.
Summary
.
Step-by-step Guide:
To assign a specific door reader for attendance capturing:
Step 1: Go to xPortalNet Client > Data Setup > System Setting >Door. The Door Setup window will be shown as below:

Figure 1: Door Setup Window
Step 2: Select the desired door to be used for recording attendance transactions in the Door Setup window and click Modify.

Figure 2: Selecting the Door to Record Attendance Transactions
Step 3: Under the Is Attendance Capturing Door field, select the appropriate configuration setting and Click OK to save changes. More information on the settings can be found in the table that follows.

Figure 3: Edit Door Window

Step 4: The following message window will be shown to indicate that the Record is Updated. Click OK to continue.

Figure 4: Record Updated Window
Step 5: The Send Data and Command window will then be shown. Please wait for the Send Data and Command process to complete before clicking Close.

Figure 5: Send Data and Command Window
.
.
To create a work schedule:
Step 1: Go to xPortalNet Client > Report > Staff Attendance Report >Attendance Schedule. The Work Schedule Setup window will be shown as below:

Figure 6: Work Schedule Setup Window
Step 2: The Add Shift Setting window will be shown. Click Add to create a new work schedule. Fill up all information accordingly as per the table that follows and click OK to save the changes.

Figure 7: Add Shift Setting Window
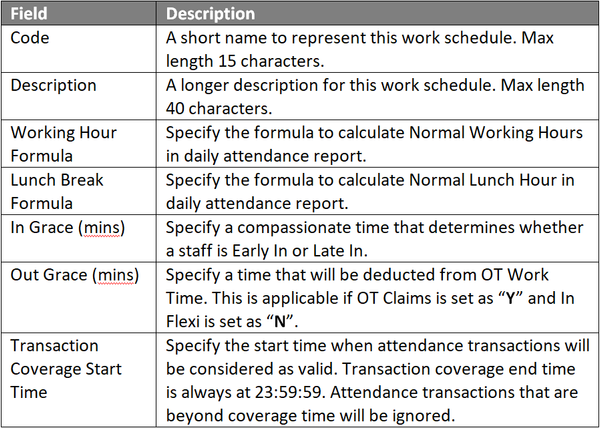
Step 3: Next, configure work time setting on table under the section of Schedule Details for start working time, end working time, lunch time, OT and minimum working hours.
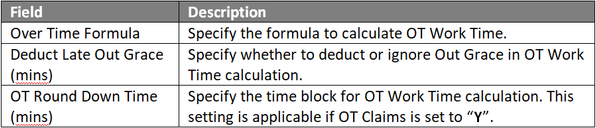
Step 4: If the new work schedule requires calculation for Overtime (OT), go to the Over Time Tab to configure calculations for working overtime. Click OK to save the changes.

Figure 8: Over Time Tab
.
To assign the new work schedule to staffs:
Step 1: Go to xPortalNet Client > Data Setup > Access Data Setting > Staff Record. The Staff Detail List window will be shown. Click Get Now!

Figure 9: Staff Detail List Window
Step 2: The Staff Detail Setup window will be shown. Click Add to add new staff or click Modify for existing staff. Under the Shift Code field, click the drop-down dialog box and select the newly added work schedule. Click OK to save the changes.

Figure 10: Selecting the Newly Added Work Schedule under the Shift Code Field
Step 3: The following message window will be shown to indicate that the Record is Updated. Click OK to continue.

Figure 11: Record Updated Window
Step 4: The Send Data and Command window will then be shown. Please wait for the Send Data and Command process to complete before clicking Close.

Figure 12: Send Data and Command Window
Step 5: Back at the Staff Detail Setup window, click Close to return to home window.