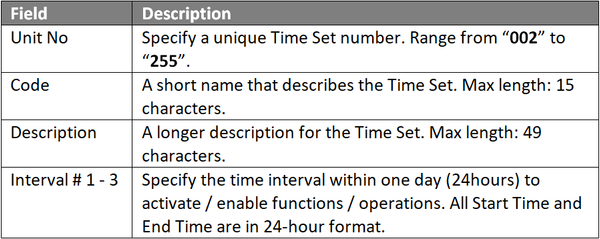
Step 1: Go to xPortalNet Client > Data Setup > Access Data Setting > Time Set.
Step 2: Click Add to add a new time set. The Add Time Set window will be shown. Fill up the time set information accordingly. Click OK to save the changes.

Figure 1: Add Time Set Window
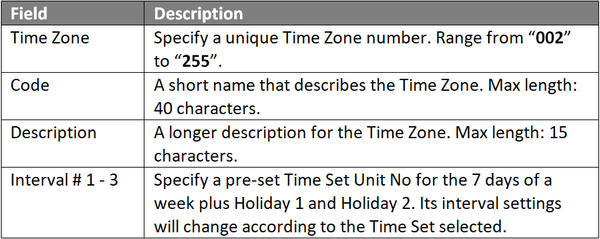
Step 1: Go to xPortalNet Client > Data Setup > Access Data Setting > Time Zone.
Step 2: Click Add to add new time set. Fill up the time zone information accordingly. Click OK to save the changes.

Figure 2: Add Icon in Time Zone Setting Window
Step 3: The following window will be shown to indicate that the Record is Updated. Click OK to continue.

Figure 3: Record Updated Window
Step 4: The Send Data and Command window will be shown. Please wait for the Send Data and Command process to complete before clicking Close.

Figure 4: Send Data and Command Window
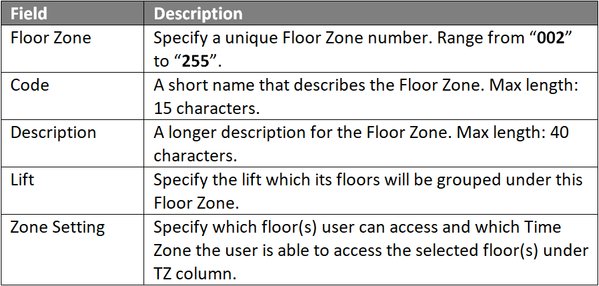
Step 1: Go to xPortalNet Client > Data Setup > Access Data Setting > Floor Zone.
Step 2: Click Add to add new floor zone. The Add Floor Zone window will be shown. Fill up the floor zone information accordingly. Click OK to save the changes.

Figure 5: Add Floor Zone Window
Step 3: Examples of floor zone setups are shown in screenshots that follow:

Figure 6: Example of Floor Zone 3 – This setting indicates that the assigned user of Floor Zone 3 can only access from 1F of Block A to 1F of Block A (only 1 accessible floor)

Figure 7: Example of Floor Zone 4 – This setting indicates that the assigned user of Floor Zone 4 can only access from 1F of Block A to 2F of Block A (2 accessible floors)
Step 3: Figure 6 and 7 above represent two different ways of configuring the Zone Setting section of the Add Floor Zone window. Figure 6 (Floor Zone 3) specifies that the user can only have access to one single floor while the method specified in Figure 7 (Floor Zone 4) allows users to configure multiple floors using the same 1 field (Zone #1).
Step 4: Suppose a maintenance personnel requires access to all 10 floors in a building, users can use the configuration method as shown in Figure 7, where the "From" field will be ground floor or first floor of the building; and the "To" field will be the 10th floor of the building. Once the Floor Accessibility containing the Floor Zone is assigned to the maintenance personnel's card, the personnel will have access to all 10 floors of the building.
Step 5: The following message window will be shown to indicate that the Record is Updated. Click OK to continue.
Figure 8: Record Updated Window
Step 6: The Send Data and Command window will be shown. Please wait for the Send Data and Command process to complete before clicking Close.

Figure 9: Send Data and Command Window
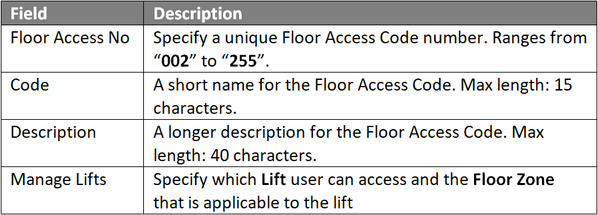
Step 1: Go to xPortalNet Client > Data Setup > Access Data Setting > Floor Accessibility.
Step 2: Click Add to add a new floor accessibility. The Add Floor Accessibility window will be shown. Fill up the floor accessibility information accordingly, Click OK to save the changes.

Figure 10: Add Floor Accessibility Window
Step 3: The following message window will be shown to indicate that the Floor Accessibility schedule is added successfully. Click OK to continue.

Figure 11: Floor Accessibility Added Successfully Window
Step 4: The Send Data and Command window will be shown. Please wait for the Send Data and Command process to complete before clicking Close.

Figure 12: Send Data and Command Window
Step 1: Go to xPortalNet Client > Data Setup > Access Data Setting > Staff Record > Get Now!
Step 2: Select the card user in list to assign with the newly configured Floor Accessibility and click Modify.
Step 3: The Edit Staff Detail window will be shown. Click on the field under Floor Access Code and select the previously configured Floor Access level for the specified card user.

Figure 13: Edit Staff Detail Window
Step 4: Click OK to save the changes.
Step 5: Users can now flash the card to the reader to check and verify that the floor accessibility has been successfully assigned to the card user.