How to Enrol Fingerprint Template at xPortalNet or xPortal3000 Software

Problem (Issue) Statement:

How to enrol fingerprint template at xPortalNet / xPortal3000 software

Description:

A guide to enrol fingerprint template at xPortalNet / xPortal3000 software. This article will guide system users to enrol card user's fingerprint via software configuration. System users can either choose to enrol fingerprint this way, or to enrol fingerprint at the XP-GT controllers.

Related Software:

  • xPortal3000
  • xPortalNet Lite
  • xPortalNet Standard
  • xPortalNet PS

Related Hardware:

  • XP- GT3500L / ABL
  • XP- GT3200L / ABL
  • BioMini fingerprint reader

System Application:

NA

Symptom and Finding:

NA

Cause:

For first time enrolment of fingerprint template at xPortalNet / xPortal3000 software.

Solution:

Warning!

  • Users are not recommended to run any xPortal software in Windows XP operating system as the system is unstable

  • Users are also advised to stop the xPortal Services before shutting down the Server PC to prevent any missing transaction issues.

.

.

Summary

.

Step-by-step Guide:

  • To enrol fingerprint template at xPortalNet software:

Step 1: Go to xPortalNet Client > Data Setup > Access Data Setting > Staff Records > Get Now! > Add.


Note

To enrol fingerprint template for existing card user already added in Staff Records, skip steps 2 & 3. 


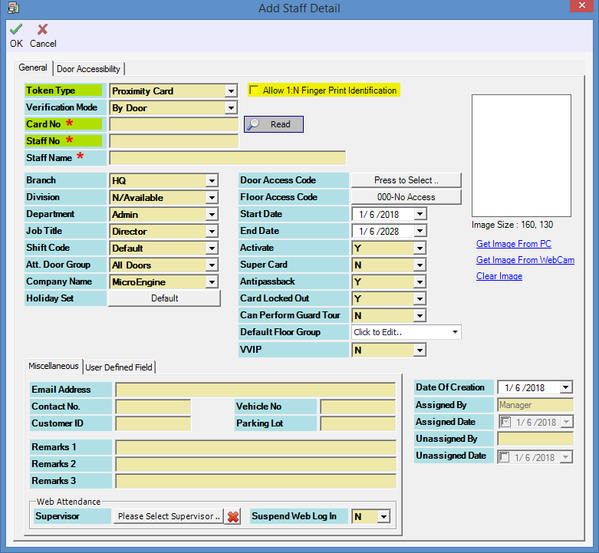
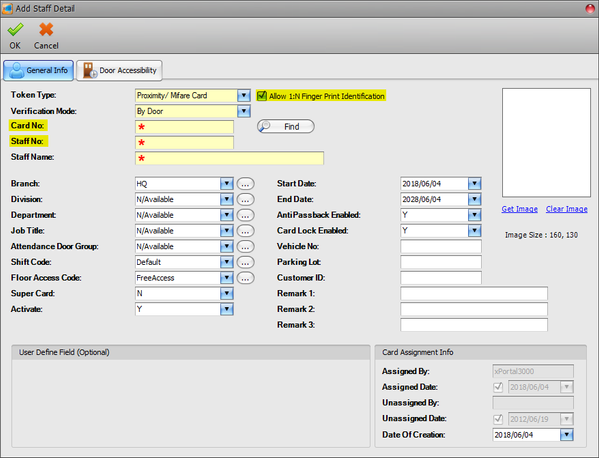
Step 2: The Add Staff Detail window will be shown as below. Fill in all the necessary information for the new card user.
Add Staff Detail Window
Figure 1: Add Staff Detail Window

Note

  • Fields marked with * are compulsory fields.
  • Field highlighted in yellow cannot be changed after the setting is saved.
  • Check the Allow 1: N Finger Print Identification checkbox to enable the software to identify the card user by matching the fingerprint to all templates in the database.


Step 3: Assign a door accessibility code to the new card user and click OK. The software will automatically update the staff record to all controllers.


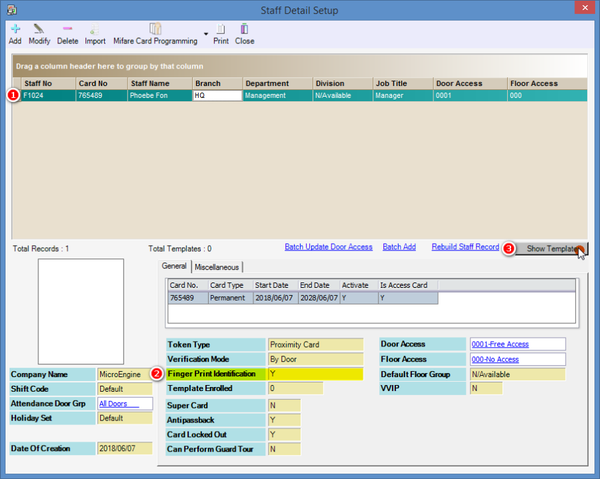
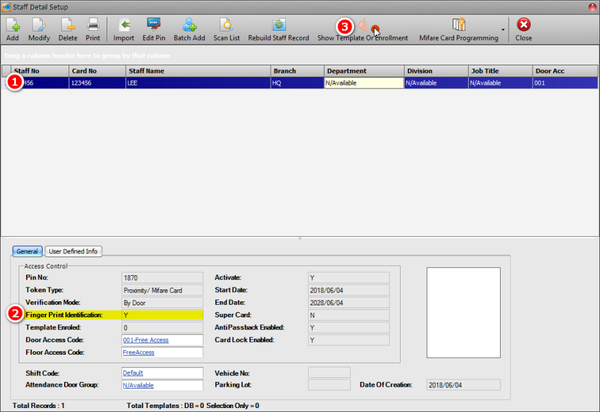
Step 4: Back at the Staff Detail Setup window, the card user's record will be shown. Select the card user to enrol the fingerprint template. Click Show Template.
Show Template Button in Staff Detail Setup Window
Figure 2: Show Template Button in Staff Detail Setup Window


Note

Ensure that the 1: N Fingerprint Identification checkbox has been checked to enable software to identify the card user by matching the fingerprint with all fingerprint templates in the database.


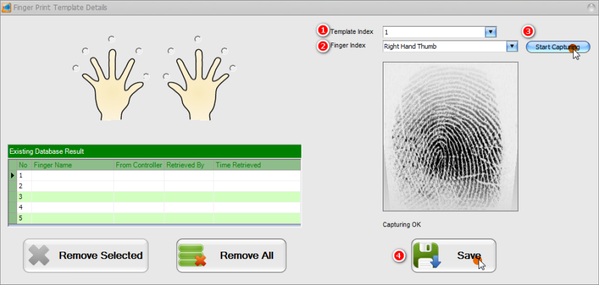
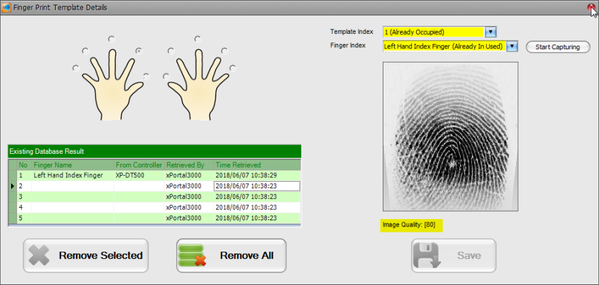
Step 5: The Finger Print Template Details window will be shown. Select the Template Index (ranging from "1" to "5" for 5 fingerprint templates per user) and Finger Index. Place finger on the BioMini fingerprint reader and click Start Capturing. When software prompts "Capturing OK" message, click Save to continue.
Finger Print Template Detail Window
Figure 3: Finger Print Template Details Window


Note

The indicator of BioMini fingerprint reader will be lighted up. Please do not remove the finger until light indicator is turned off to complete the fingerprint template capturing process.


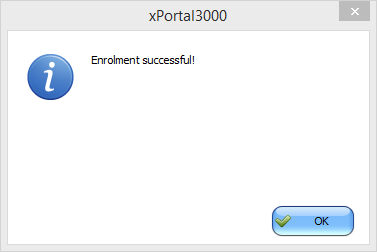
Step 6: The following message window will be shown to indicate that the enrolment is successful. Click OK to continue.
Enrolment Successful Window
Figure 4: Enrolment Successful Window


Step 7: Back at the Finger Print Template Details window, the enrolled fingerprint template will be shown in Existing Database Result section. Close the window and the software will automatically send the fingerprint data to XP-GT controller.
Enrolled Fingerprint Template Shown under Existing Database Result Section
Figure 5: Enrolled Fingerprint Template Shown under Existing Database Result section


Tip

Low fingerprint quality can affect the performance of XP-GT's fingerprint reading operation. Users are recommended to try and enrol fingerprints with image quality of 70 and above for optimum performance.


Step 8: To continue enrolling fingerprint template, repeat steps 4 to 7. To exit, simply click Close to exit Staff Detail Setup window.


  • To enrol fingerprint template at xPortal3000 software:

Step 1: Go to xPortal3000 Client > Staff Record > Add.


Note

To enrol fingerprint template for existing card user already added in Staff Records, skip steps 2 & 3.


Step 2: The Add Staff Detail window will be shown as below. Fill in all the necessary information of the new card user.
Add Staff Detail Window
Figure 6: Add Staff Detail Window


Note

  • Fields marked with * are compulsory fields.
  • Field highlighted in yellow cannot be changed after the setting is saved.
  • Check the Allow 1: N Finger Print Identification checkbox to enable the software to identify the card user by matching the fingerprint to all templates in the database.


Step 3: Assign a door accessibility code to the new card user and click OK. The software will automatically update the staff record to all controllers.


Step 4: Back at the Staff Detail Setup window, the card user's record will be shown. Select the card user to enrol the fingerprint template. Click Show Template Or Enrolment.
Show Template or Enrolment Icon in Staff Detail Setup Window
Figure 7: Show Template or Enrolment Icon in Staff Detail Setup Window


Note

Ensure that the 1: N Fingerprint Identification checkbox has been checked to enable software to identify the card user by matching the fingerprint with all fingerprint templates in the database.


Step 5: The Finger Print Template Details window will be shown. Select the Template Index (ranging from "1" to "5" for 5 fingerprint templates per user) and Finger Index. Place finger on the BioMini fingerprint reader and click Start Capturing. When software prompts "Capturing OK" message, click Save to continue.
Finger Print Template Details window
Figure 8: Finger Print Template Details Window

Note

The indicator of BioMini fingerprint reader will be lighted up. Please do not remove the finger until light indicator is turned off to complete the fingerprint template capturing process.


Step 6: The following message window will be shown to indicate that the enrolment is successful. Click OK to continue.
Enrolment Successful Window
Figure 9: Enrolment Successful Window


Step 7: Back at the Finger Print Template Details window, the enrolled fingerprint template will be shown in Existing Database Result section. Close the window and the software will automatically send the fingerprint data to XP-GT controller.
Enrolled Fingerprint Template Shown under Existing Database Result Section
Figure 10: Enrolled Fingerprint Template Shown under Existing Database Result section


Tip

Low fingerprint quality can affect the performance of XP-GT's fingerprint reading operation. Users are recommended to try and enrol fingerprints with image quality of 70 and above for optimum performance.


Step 8: To continue enrolling fingerprint template, repeat steps 4 to 7. To exit, simply click Close to exit Staff Detail Setup window.

Date Documentation:

7/6/2018 (Rev 1.0)

PROOF-READ

.

.


.

© MicroEngine Technology Sdn Bhd (535550-U). All rights reserved.