How Do I Create and Print the New Staff Badge Design in xPortalNet Software
Problem (Issue) Statement: | How Do I Create and Print the New Staff Badge Design in xPortalNet Software |
Description: | Badge Designer is used to create the Badge Design for the staff record. User can use the default design or create a new one based on their preferences. Inside the designer, there are toolkit provided and it is easy to use. |
Related Software: | xPortalNet v1.5.0.155 or higher |
Related Hardware: | NIL |
System Application: | Door Access System |
Symptom and Finding: | NIL |
Cause: | NIL |
Solution: | Warning!
. . Summary. Step-by-step Guide:
In these steps, user will be guided to enable the "Use Badge" function. Step 1: Run xPortalNet Server. Step 2: Go to Server Admin > System Properties. Step 3: The System Properties window will be shown. Click the General tab. Step 4: Click Modify. Enable the "Use Badge" field. Step 5: Click OK to confirm and save changes. "Record Updated!" message will be shown. Step 6: Login to xPortalNet Client software and download the settings.
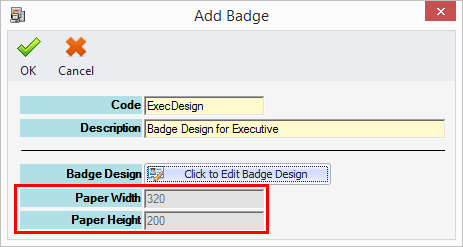
In these steps, user will be guided to create new badge design. Step 1: Run xPortalNet Client software. Step 2: Go to Device Comm > Send Door Setting > Door Parameters. Step 3: Open Badge Designer. Go to Data Setup > System Setting > Badge Designer. Important If the Badge Designer menu cannot be found from the list, you may need to check the System Properties in xPortalNet Server. This feature must be enabled in advanced. After that, please download the settings at xPortalNet Client. Step 4: The Badge Setup window will be shown. Click Add to create new badge design. Step 5: At Add Badge window, fill up the Code and Description for this Badge Design. Then, click "Click to Edit Badge Design". Step 6: You can create the badge design in the white canvas provided. You have to drag the item from the designer toolkit. Step 7: Refer to the following example as reference.
Step 8: Once finished designing the badge, click OK. Then, click Yes to confirm the changes made. Step 9: You can see that the Paper Width and Paper Height are updated. Click OK. Step 10: "Record Added !" message will be shown. Click OK. Step 11: You have successfully created a new badge design. Information You can modify the badge design at any time. Just select the design code, then click Modify button. Step 1: At Edit Badge window, you can update the Description for this Badge Design. Then, click "Click to Edit Badge Design" to start the modification. Step 2: Once finished editing, click OK. "Record Updated !" message will be shown. . .
In these steps, user will be guided to assign and print the new badge design. Step 1: To assign the Badge Design to staff profile, go to Data Setup > Access Data Setting > Staff Records. Step 2: Add or Modify the staff profile. Step 3: At Badge Design field, specify the badge design code that is desired for each staff profile. Step 4: Click OK to confirm and save changes. Step 5: To print the badge, click Print Badge. Step 6: At Select User window, specify the Badge Design code to be printed. Step 7: Upon clicking Badge Design, the following window will be shown. Please select the Badge Design Code that you want to print. Then click OK. Step 8: Once you click OK after making selection on Card Group, the preview of your selected Badge Design can be seen. Step 9: You can print or export the file for future printing. Step 10: Finished. |
Document Date | 20/08/2018 (Rev 1.0) |


PROOF-READ
.
.
.
© MicroEngine Technology Sdn Bhd (535550-U). All rights reserved.