Summary
Step-by-step Guide:
Step 1: Go to xPortalNet Client > Data Setup > System Setting > MyKad Reader Setting.
Step 2: The MyKad Reader Settings window will be shown as below. Configure the MyKad reader Model and Read Time Out settings and click OK to save the changes.

Figure 1: MyKad Reader Settings Window
.
.
To add visitor access card to Card Records:
Step 1: Go to xPortalNet Client > Data Setup > Access Data Setting > Card Records > Get Now!

Figure 2: Card Detail List Window
Step 2: The Card Detail Setup window will be shown as below. Click Add to add a new Visitor Card.

Figure 3: Card Detail Setup Window
Step 3: The Add Card Detail window will then be shown as below. Enter the Card No which will be assign as visitor access card and click OK to continue.

Figure 4: Add Card Detail Window
Step 4: The following message window will be shown to indicate that the Record is Updated. Click OK to continue.

Figure 5: Record Updated Window
Step 5: Back at the Card Detail Setup window, details of the new visitor access card will be shown in the list.

Figure 6: Details of the Newly-added Visitor Access Card in Card Detail Setup Window
Step 6: To continue adding new visitor access cards, repeat steps 2 to 4. To exit, simply click Close.
.
.
To register visitors using xPortalNet:
Step 1: Go to xPortalNet Client > Visitor Still In List tab. The following window will be shown as below. Click VISITOR SIGN IN or press F3.

Figure 7: Visitor Still In List tab
Step 2: The Visitor ID Information window will be shown as below. Select the ID type and fill in the ID number. Click NEXT to continue.

Figure 8: Visitor ID Information Window
.
.
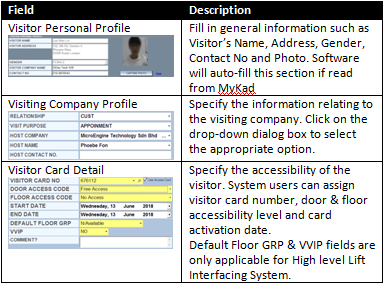
Step 3: The Visitor Sign In Transaction window will then be shown. Once data has been collected from the chosen ID type, xPortalNet Client will automatically fill in the general information such as Visitor Name, Address, Gender and Photo. Users may fill in the other fields and click NEXT to continue.

Figure 9: Visitor Sign In Transaction Window
Step 4: The following message window will be shown to indicate that the visitor has been signed in successfully. Click OK to continue.

Figure 10: Visitor Sign In Successfully Window
Step 5: The Delivery Report window will be shown to indicate the progress of sending the visitor access card number to all controllers. Wait until the Delivery Report prompts the data sending process is completed before clicking Close to continue.

Figure 11: Delivery Report Window
.
.
To observe Visitor Still In List and Latest event List to ensure that the visitor record is logged:
Step 1: At the Visitor Still IN List, the registered visitor is recorded as being "Still In".

Figure 12: Registered Visitor is Still In
Step 2: At the Latest Event List, software recorded the "Visitor SignIn", "Card Assignment", "Card Inventory" and "Visitor Record" transactions.

Figure 13: Latest Event List Showing Registered Visitor's Transaction Logs
Step 3: When the visitor flashed the card on Exit reader, the Latest Event List will log the "Valid Exit Access", "Card Inventory", "Card Assigment" and "Visitor SignOut" transaction (if visitor auto sign out feature is enabled and the transaction direction is configured).

Figure 14: Latest Event List Showing the Registered Visitor's Exit Access Transaction Logs
Step 4: The transaction log in the Visitor Still In List will also be automatically updated and removed.

Figure 15: Visitor Still In List Updated and the Registered Visitor Transaction Log is Removed