How to Perform Auto Database Migration for Existing xPortalNet v1.5 Database

Problem (Issue) Statement:

How to perform auto database migration for existing xPortalNet v1.5 database

Description:

A guide to auto migrate existing xPortalNet v1.5 database to new xPortalNet v1.5 software instance.
The process of auto database migration can be applied when users wish to upgrade / update current xPortalNet v1.5 software version to a newer version.

Related Software:

  • xPortalNet v1.5.0.71 or above

Related Hardware:

NIL

System Application:

NIL

Symptom and Finding:

NIL

Cause:

For first time guide to auto migrate xPortalNet software's existing database to a new xPortalNet software instance.

Solution:

Warning!

  • Users are not recommended to run any xPortal software in Windows XP operating system as the system is unstable

  • Users are also advised to stop the xPortal Services before shutting down the Server PC to prevent any missing transaction issues.

.

.

Summary:

  • To perform auto database migration for xPortalNet v1.5 software.


Step-by-step Guide:

  • To perform auto database migration for xPortalNet v1.5 software:

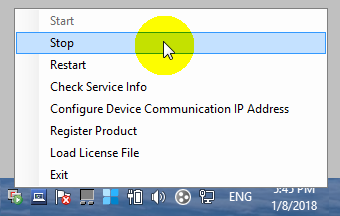
Step 1: Ensure that the xPortalNet Services is stopped. Right-click the xPortalNet Comm Service icon and click Stop.
Stopping the xPortalNet Comm Service Application
Figure 1: Stopping the xPortalNet Comm Service Application


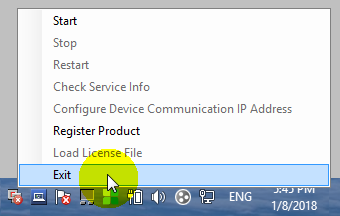
Step 2: Exit the xPortalNet Services. Right-click the xPortalNet Comm Service again and click Exit.
Exiting the xPortalNet Comm Service Application
Figure 2: Exiting the xPortalNet Comm Service Application


Step 3: Go to Control Panel > Programs and Features. Click Uninstall to uninstall the existing xPortalNetv1.5 application.


Step 4: Install newer version of the xPortalNet v1.5 software.


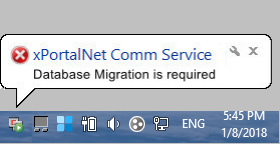
Step 5: Run the newly installed xPortalNet Comm Services, the following message will be prompted to indicate that a database migration is required.
Database Migration is Required Message
Figure 3: Database Migration is Required Message


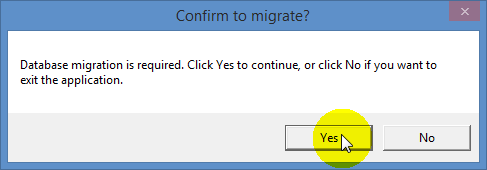
Step 6: Run the newly installed xPortalNet Server application. The following window will be shown to confirm executing the database migration process. Click Yes to continue.
Confirm to Migrate Window
Figure 4: Confirm to Migrate Window


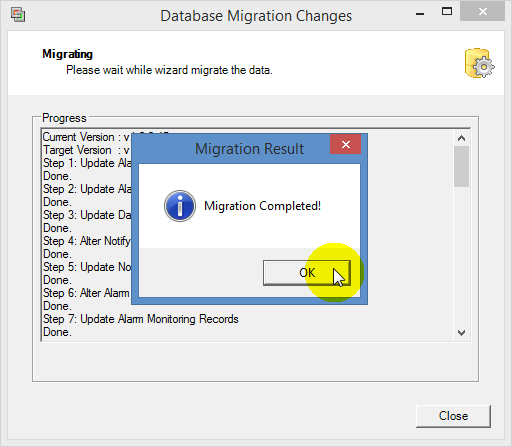
Step 7: The Database Migration Changes window will then be shown. Wait for the migration process to complete. Upon completion, the following window will be shown to indicate that the migration process is complete. Click OK to continue. Users can then proceed to login to the xPortalNet Server as usual.
Migration Result Window after Database Migration is Completed
Figure 5: Migration Result Window after Database Migration is Completed

Date Documentation:

1/8/2018 (Rev 1.0)

PROOF-READ

.

.


.

© MicroEngine Technology Sdn Bhd (535550-U). All rights reserved.