How to Enable Client GAC Controller Setup in xPortalNet Client

Problem (Issue) Statement:

How to enable Client GAC controller setup in xPortalNet Client

Description:

A guide to enable Client GAC controller setup in xPortalNet Client.

Global AntiPassback feature allows the software to enforce AntiPassback in the global network (across different controllers connected in the same network).

When enabled, AntiPassback prevents a card user from gaining two successive accesses in the same direction without gaining access in the opposite direction first. AntiPassback therefore prevents double entry or exit access through a door or area for the same card access.


Note

XP-SNET-GAC controller is only supported for LAN Network Communications only.

.

Tip

Controller models supported as GAC Client: XP-SNETv3.36, XP-SNETv4, XP-M2000i v6.10 and above, and XP-M1000i v6.00 and above.

Related Software:

  • xPortalNet v1.5

Related Hardware:

  • XP-M1000iv2 / M1300i v6.00 above
  • XP-M2000i / M2300i v6.10 above
  • XP-SNET / SNETv4 v3.36 above
  • XP-GAC v2.40

System Application:

  • Door Access System
  • Car Park Access System
  • Turnstile Access System

Symptom and Finding:

NIL

Cause:

For first time guide to enable Client GAC controller setup in xPortalNet Client.

Solution:

Warning!

  • Users are not recommended to run any xPortal software in Windows XP operating system as the system is unstable

  • Users are also advised to stop the xPortal Services before shutting down the Server PC to prevent any missing transaction issues.

.

.

Warning!

XP-SNET-GAC currently do not support odd numbered card lengths, e.g. 5, 7, 9 card number lengths.

.

.

Summary:


Note

Global Antipassback feature is only supported for LAN Network Communications.


Step-by-step Guide:

  • To configure AntiPassback feature on client GAC controller:

Step 1: Go to xPortalNet Client > Data Setup > System Setting > Controller.


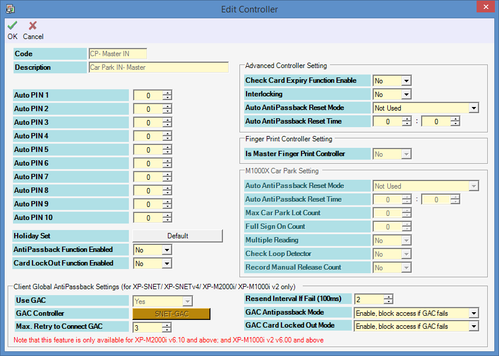
Step 2: In the Controller Setup window, select the controller to be assigned as client GAC controller to enable AntiPassback feature and click Modify.
Edit Controller Window
Figure 1: Edit Controller Window


Step 3: At the AntiPassback Function Enabled field, click on the drop-down dialog box and select Yes.
AntiPassback Function Enabled Setting
Figure 2: AntiPassback Function Enabled Setting


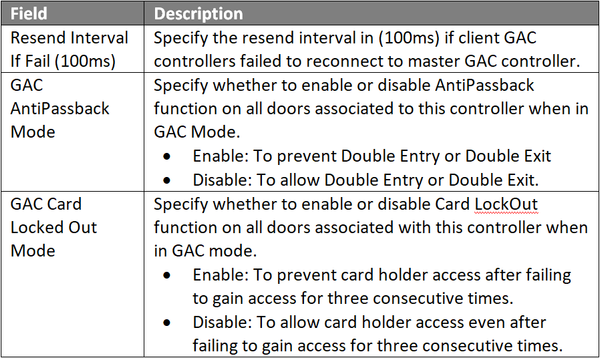
Step 4: Under the Client Global AntiPassback Settings section, configure the respective fields according to the table that follows. Click OK to save the changes.
Client Global AntiPassback Settings Section in Edit Controller Window
Figure 3: Client Global AntiPassback Settings Section in Edit Controller Window


Step 6: The software will prompt the following message window to prepare the process of sending GAC Parameters Command to client GAC controller. Wait for the process to finish and click OK on Delivery Report to continue.
Preparing GAC Parameters Command Window
Figure 4: Preparing GAC Parameters Command Window


Step 7: To configure another Client GAC controller, repeat steps 1 to 5.
.

.

  • To configure Zone Code in Door Setup window:

Step 1: Go to xPortalNet Client > Data Setup > System Setting > Door.


Step 2: The Door Setup window will be shown. Select the specific door to configure zone code click Modify to continue.


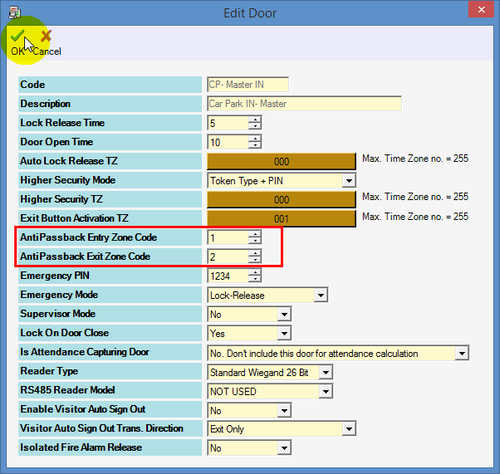
Step 3: The Edit Door window will then be shown. Configure the AntiPassback Entry & Exit Zone Code accordingly and click OK to save the changes.
AntiPassback Entry and Exit Zone Code Settings in Edit Door Window
Figure 5: AntiPassback Entry and Exit Zone Code in Edit Door Window


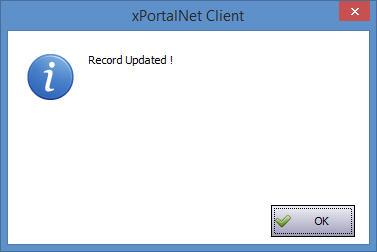
Step 4: The software will then prompt the following message window to indicate that the Record is Updated. Click OK to continue.
Record Updated Window
Figure 6: Record Updated Window


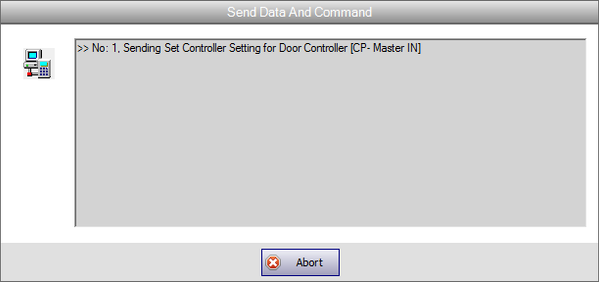
Step 5: The Send Data and Command window will then be shown. Wait for the send controller setting process to complete before clicking Close to continue.
Send Data and Command Window
Figure 7: Send Data and Command Window


Step 6: To configure zone code for another Client GAC controller, repeat steps 1 to 5.
.

.

  • To send the configuration settings to Door Controller:

Step 1: Go to xPortalNet Client > Device Comm > Send Door Setting
Send Door Setting Button in Device Comm Icon
Figure 8: Send Door Setting Button in Device Comm Icon


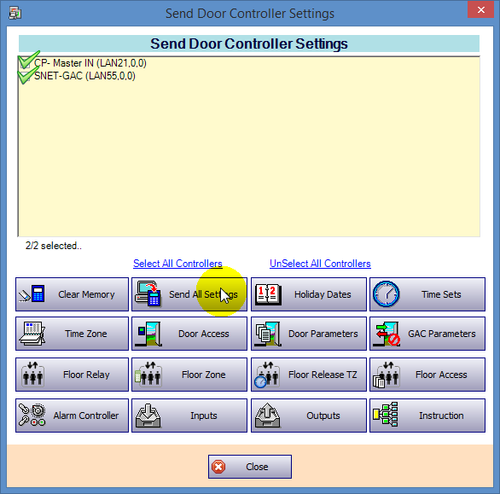
Step 2: Select both the SNET-GAC controller and the client GAC Controller. Click Send All Setting.
Send Door Controller Settings Window
Figure 9: Send Door Controller Settings Window
.

.

  • To observe transaction logs after completing configuration settings to ensure that Global AntiPassback is enforced:

Step 1: Flash a test card on entry reader more than twice. Ensure that the Latest Event List recorded a Valid Entry Access transaction, followed by AntiPB Violation transaction logs.
Valid Entry Access and AntiPB Violation Transaction Logs

Figure 10: Valid Entry Access and AntiPB Violation Transaction Logs

Date Documentation:

4/7/2018 (Rev 1.0)

PROOF-READ

.

.


.

© MicroEngine Technology Sdn Bhd (535550-U). All rights reserved.