Summary
Step by step:
To enable DESFire Personalization in xPortalNet HS Server:
Step 1: Ensure that the xPortalNet HS Services is running.
Step 2: Go to xPortalNet HS Server > Server Admin > System Properties > Modify.

Figure 1: The Modify Icon in System Properties Window
Step 3: The Edit System Properties window will be shown. Under the Enable DESFire Personalization field, click on the drop-down dialog box and change the setting to Yes. Click OK to continue.

Figure 2: Enable DESFire Personalization in Edit System Properties Window
Step 4: The following message window will be shown to indicate that the Record is Updated. Click OK to continue.

Figure 3: Record Updated Window
Step 5: The following message window will then be shown to remind system users to download the Door Parameter settings to all controllers. Click OK to continue.

Figure 4: Message Window to Remind System Users to Download Door Parameter Settings to All Controllers.
Step 6: Back at the System Properties window, click Close to return to the xPortalNet HS Server's home window.
To setup the DESFire Key Management by creating a DESFire PICC Master Key and Application Key:
Step 1: Go to xPortalNet HS Client > Data Setup > System Setting > DESFire Personalization > DESFire Key Management > DESFire PICC Master key.

Figure 5: Creating DESFire PICC Master Key
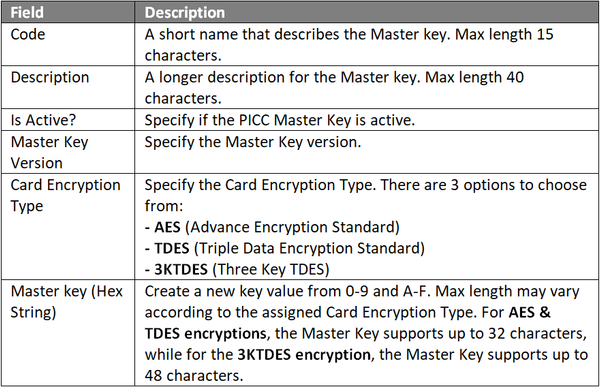
Step 2: Click Add to add a new DESFire PICC Master key. The Add DESFire PICC Master Key window will then be shown. Fill in the respective fields and click OK to save the changes.

Figure 6: Add DESFire PICC Master Key Window
Step 3: xPortalNet HS Client software will then prompt the following message window for confirmation to save the settings. Click Yes to confirm saving the changes.

Figure 7: Confirming to Create the PICC Master Key
Step 4: The following message window will be shown to indicate that the Record is Updated. Click OK to continue.

Figure 8: Record Updated Window
Step 5: Next, go to xPortalNet HS Client > Data Setup > System Setting > DESFire Personalization > DESFire Key Management > DESFire Application key.

Figure 9: Creating DESFire Application Key
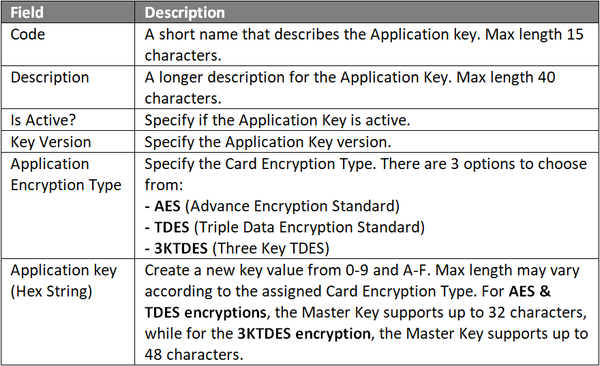
Step 6: Click Add to add new DESFire Application Key. The Add DESFire Application Key window will then be shown. Fill in the respective fields and click OK to continue.

Figure 10: Add DESFire Application Key Window
Step 7: xPortalNet HS Client software will then prompt the following message window for confirmation to save the settings. Click Yes to confirm saving the changes.

Figure 11: Confirming to Create the Application Key
Warning: The created Application Key cannot be deleted in the software.
Step 8: The following message window will be shown to indicate that the Record is Updated. Click OK to continue.
Figure 12: Record Added Window
To setup the Credentials Configuration:
Step 1: To create Credentials Profile. Go to xPortalNet HS Client >Data Setup>System Setting>DESFire Personalization>Credentials Configuration

Figure 13: Creating Credentials Configuration Setup
Step 2: Click Add to add a new DESFire Credential Profile.
Step 3: The Welcome window of the Add DESFire Credentials Profile will be shown. Click Next to continue.

Figure 14: Welcome Window of the Add DESFire Credentials Profile
Step 4: The Select Setup Mode window will then be shown. Check the Create with MicroEngine Default Profile checkbox and click Next to continue.

Figure 15: Add DESFire Credentials Profile
Step 5: The General Profile Settings window will then be shown. Fill up all respective fields for Credential Profile and click Next to continue.

Figure 16: General Profile Settings Window
Step 6: The Customize MicroEngine Profile window will then be shown. Select the configured PICC Master Key and Application Key and click Next to continue.

Figure 17: Customize MicroEngine Profile Window
Step 7: At the following window, users are advised to leave the configuration settings as default. Click Next to continue.

Figure 18: Customize MicroEngine Profile Window
Step 8: The Completing the Wizard window will be shown. Click Finish to close the wizard.

Figure 19: Completing the Wizard
Step 9: xPortalNet HS Client software will then prompt the following message window for confirmation to save the settings. Click Yes to confirm saving the changes.

Figure 20: Confirming to Create Credential Settings
.
.
Step 9: Users can now proceed to add DESFire card users to the Staff Records.