How to Configure RS485 Address for XP-GT3500 or XP-GTR1500 Controller

Problem (Issue) Statement:

How to configure RS485 address for XP-GT3500 / XP-GTR1500 controller

Description:

A guide to configure RS485 address for XP-GT3500 / XP-GTR1500 controller.

Related Software:

NA

Related Hardware:

  • XP-GTR1500L
  • XP-GTR1500ABL
  • XP-GT3500L
  • XP-GT3500ABL

System Application:

Single Door Access

Symptom and Finding:

NA

Cause:

For first time configuration on RS485 address for GT3500 / XP-GTR1500 controller.

Solution:

Note

Fore RS485 wiring connections between the controller and the Server PC, the Daisy Chain connection topology is the recommended wiring connection.

Warning!

RS485 wiring connection using the Star topology may result in controller communication issues!

Summary

.

Note

The address of the controller must be unique (ranging from '00' to '15'), i.e.: no two controller in the same RS485 connection network can have the same address.

.

.

Step-by-step Guide:

  • To perform ColdStart after first time power up of the XP-GT3500 / XP-GTR1500 controller:

Note

  • Users are advised to perform ColdStart operation once for every fresh installation unless advised otherwise.
  • ColdStartoperation resets the controller's memories. All the database in the controller will be deleted.

.

.

Step 1: Press and hold the ColdStart button on the controller board.

.
Step 2: Turn OFF the power supply.

.
Step 3: Turn ON the power supply.

.
Step 4: Release the ColdStart button after 3 seconds. The controller will respond with a long beep to indicate that the ColdStart process is in effect.

.

.

  • Method 1: To configure RS485 address of the controller via Web Diagnostic:

Step 1: Connect the network cable to the controllers. Ensure that both the network port LED is blinking.

.
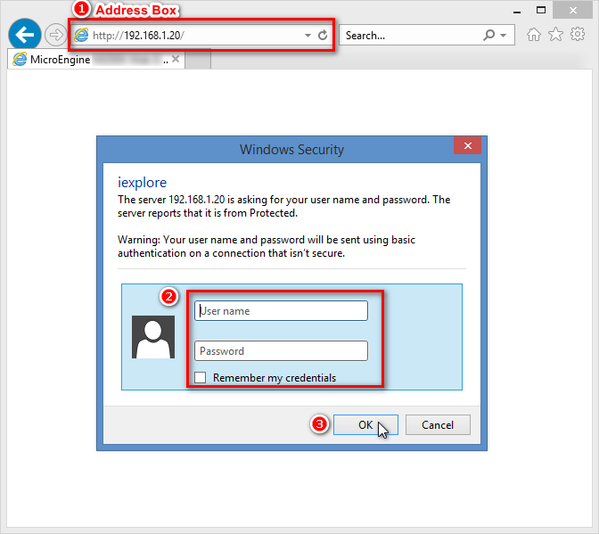
Step 2: Open IE browser (Internet Explorer) and type the default IP address in the address box.

.

Note

Default IP address for XP-GT3500 / XP-GTR1500 controllers: 192.168.1.20

.

.
Step 3: The Windows Security dialog box will be shown. Enter the User name and Password and click OK to continue. 

.

Note

Default User Name: admin

Password: password10

.

.
Windows Security Dialog Box
Figure 1: The Windows Security Dialog Box


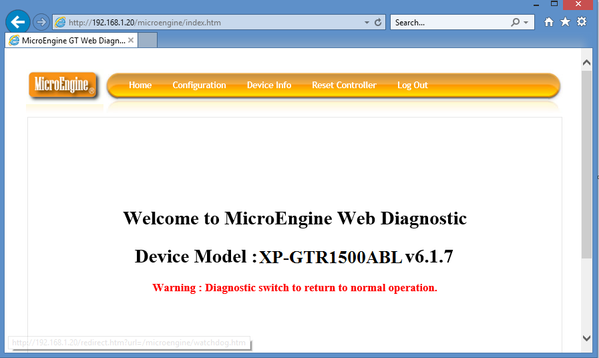
Step 3: Once the login is successful, the following home window will be shown:
The Web Diagnostic Home Window
Figure 2: The Web Diagnostic Home Window


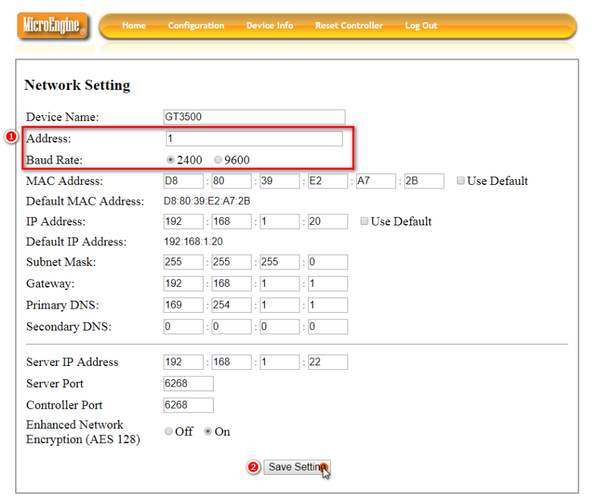
Step 4: Go to Configuration > Network. The Network Setting window will be shown. Configure the Address setting for RS485 and Baud Rate respectively.
The Network Setting Window
Figure 3: The Network Setting Window

Step 4: Click Save Setting. The controller will automatically restart to save all changes.

.

.

  • Method 2: To configure RS485 address of the controller via on-board keypad programming:

Step 1: The following home screen will be shown at the controller's LCD:
Controller LCD Home Screen
Figure 4: Controller LCD Home Screen


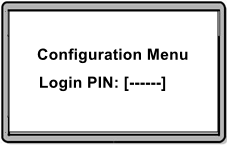
Step 2: To enter Configuration Menu for the first time, press asterisk key (*) and enter the 6-digits default MasterPIN.

.

Note

Default MasterPIN: 123456

.

.
Entering Default MasterPIN for the First Time
Figure 5: Entering default MasterPIN for first time login


Step 3: The following window will then be shown to prompt users to enter a new MasterPIN which will be used for subsequent logins to enter Configuration Menu.
Entering a New MasterPIN
Figure 6: The Change MasterPIN Window


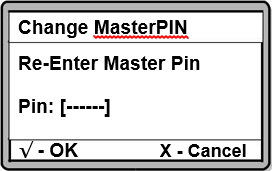
Step 4: Re-enter the same MasterPIN and press to confirm the new 6-digits MasterPIN.
Re-confirming the New MasterPIN
Figure 7: Re-enter the Same MasterPIN to confirm the MasterPIN


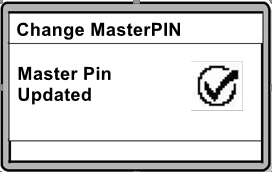
Step 5: The following window will be shown once the new MasterPIN is updated successfully.
MasterPIN Updated Window
Figure 8: The MasterPIN Updated Window


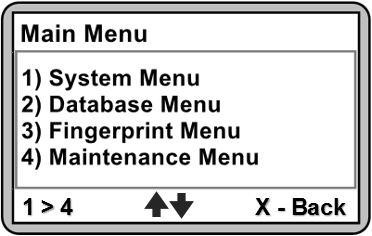
Step 6: Press the asterisk (*) key, followed by the new MasterPIN to enter Configuration Menu. The following Main Menu window will be shown upon entering Configuration Menu.
The Main Menu Window
Figure 9: The Main Menu Window


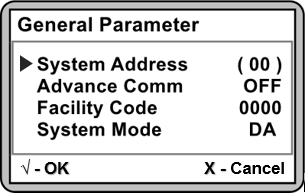
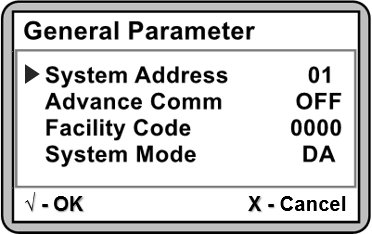
Step 7: Press 1 for System Menu. Press 6 to access the General Parameter menu. The following window will be shown. Press to change the System Address setting (indicated by the brackets) and press or to configure the unit no for controller's RS485 address.
The General Parameter Window
Figure 10: The General Parameter Menu


Step 8: Press to save the changes (the brackets will disappear). The following window will be shown:
The Modified System Address Configuration
Figure 11: The Modified System Address Configuration


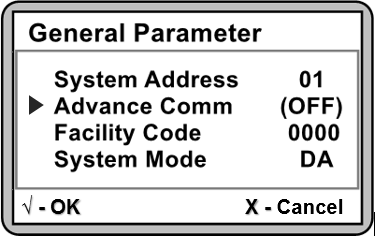
Step 9: To change the controller baud rate, press to move the cursor to Advance Comm parameter. Press to change the Advance Comm parameter setting (indicated by the bracket) and press or to configure the baud rate.
To Change the Advance Comm Configuration
Figure 12: To Change the Controller Baud Rate

.

Note

Advance Comm to OFF indicate baud rate of 2400; Advance Comm to ON indicate baud rate of 9600.

.

.

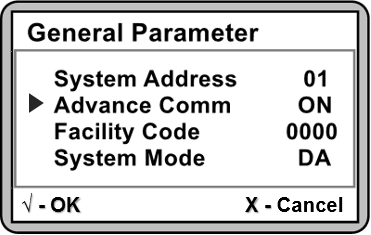
Step 10: Press the to save the changes (the bracket will disappear). The following window will be shown:
The Modified Advance Comm Configuration
Figure 13: The Modified Advance Comm Configuration


Step 11: To exit the General Parameter menu, press ×. The following window will be shown to prompt users to save changes. Press to save all changes made previously.
The Save Changes Window
Figure 14: The Save Changes? Window

.

Note

If users exit the General Parameter menu without pressing to save the changes, all previously changed settings will be lost.

.

.

Step 12: The following window will be shown once the changes have been saved.
The Save Done Window
Figure 15: The Save Done! Window 

Date Documentation:

2/5/2018 (Rev 1.0)

PROOF-READ

.

.


.

© MicroEngine Technology Sdn Bhd (535550-U). All rights reserved.