How to Configure Time Zone Settings in xPortalNet Software
Problem (Issue) Statement: | How to configure Time Zone settings in xPortalNet software |
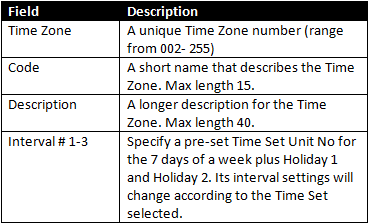
Description: | A guide to configure Time Zone settings in xPortalNet software. The Time Zone settings can be assigned to certain functions (such as Door Accessibility, Auto Lock Release, Card + PIN, AutoPIN) to determine at which day and time the system will enable / operate the functions. |
Related Software: |
|
Related Hardware: |
|
System Application: |
|
Symptom and Finding: | NA |
Cause: | For first time configuration for Time Zone settings in xPortalNet software. |
Solution: | Warning!
. . Summary
Step-by-step Guide:
Step 1: Ensure that xPortalNet Services is running.
Note
Knowledge Base Link Users can refer to How to Configure Time Set Settings in xPortalNet Software to configure the Time Set settings.
|
Date Documentation: | 4/6/2018 (Rev 1.0) |


PROOF-READ
.
.
.
© MicroEngine Technology Sdn Bhd (535550-U). All rights reserved.