How to Configure Fire Alarm Auto Release for All Doors at xPortal3000

Problem (Issue) Statement:

How to configure fire alarm auto release for all doors at xPortal3000

Description:

A guide to configure fire alarm auto release for all doors at xPortal3000.

Related Software:

  • xPortal3000 v3.0.0.28

Related Hardware:

  • XP-M1000iv2
  • XP-M2000i
  • XP-GT3500L / ABL*
  • XP-GTR1500L / ABL*


Note

*For XP-GT3500L / ABL and XP-GTR1500L / ABL controllers, users have to be sure to terminate the fire alarm signal into the controller's fire alarm terminal block instead of the MAS-RBM / MAS-RBU's fire alarm terminal block in order to use the functions highlighted by this article.

System Application:

  • Software configuration for fire alarm release.

Symptom and Finding:

NA

Cause:

For first time configuration on fire alarm auto release for all doors at xPortal3000.

Solution:

Warning!

  • Users are not recommended to run any xPortal software in Windows XP operating system as the system is unstable

  • Users are also advised to stop the xPortal Services before shutting down the Server PC to prevent any missing transaction issues.

.

.

Summary

.

Step by Step:

  • To enable Fire Alarm Auto Release setting:

Step 1: Run xPortal3000 Server Configuration Manager. Ensure that the Service State is "Running". Click Start if the Service State is "Stopped".
xPortal3000 Server Configuration Manager Window
Figure 1: xPortal3000 Server Configuration Manager Window


Step 2: Open xPortal3000 client. Click Control Panel.
Control Panel Icon
Figure 2: Control Panel Icon


Step 3: The Control Panel menu will be shown. Click System Properties.
System Properties Icon
Figure 3: Control Panel Menu


Step 4: The System Properties window will be shown. Click Modify. Go to General Tab and select "Yes" at the Fire Alarm Auto Release field to enable this feature. Click OK to save the changes.
System Properties Window
Figure 4: System Properties Window


Step 5: The following message window will be shown to indicate that the Record is Updated. Click OK to continue.
Record Updated Window
Figure 5: Record Updated Window


Step 3: The Delivery Report window will be shown. Ensure that all the controller settings are sent successfully. Click OK to complete the process.
Delivery Report Window
Figure 6: Delivery Report Window

.

.

  • To download Door Settings:

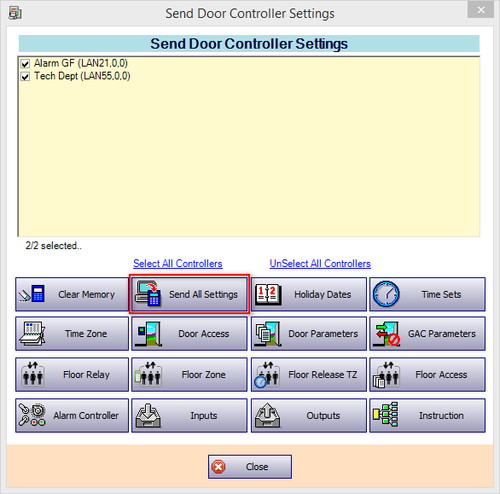
Step 1: Go to xPortalNet Client > Device Comm > Send Door Setting.


Step 2: The Send Door Controller Settings window will be shown. Check the desired controller's checkbox and click Send All Settings. 
Send Door Controller Settings Window 
Figure 7: Send Door Controller Settings Window.

.

.

  • To observe event transaction before Fire Alarm is triggered:

Step 1: Go to Device List > Controller List. Ensure that all door controller statuses are Normal.
Controller List under Device List Tab
Figure 8: Controller List under Device List


Step 2: Go to Device List > Door List. Ensure that all related Door statuses are Up and that Security status is Y.
Door List under Device List tab
Figure 9: Door List under Device List
.

.

  • To observe event transaction after Fire Alarm is triggered:

Step 1: At the Latest Event List window, ensure that the transaction Release All Doors On Fire Alarm, Door Security Off from all related doors and Fire Alarm On are recorded from the source controller.
Latest Event List Window
Figure 10: Latest Event List Window


Step 2: At the Latest Alarm Event List, ensure that the Fire Alarm On transaction is logged.
Latest Alarm Event List Window Recording the Fire Alarm On Transaction
Figure 11: Latest Alarm Event List recording the Fire Alarm On Transaction


Step 5: Also, ensure that all electromagnetic lock for all physical doors are released.


Note

The electromagnetic lock for the physical doors will be released when the controller and door statuses are Up.


  • To configure Doors back to normal operation:

Step 1: Go to Device Comm > Send Door Command.
Send Door Command Icon
Figure 12: Send Door Command Icon


Step 2: The Send Door Command window will be shown. Select the desired door name and click Security On.
Send Door Command Window
Figure 13: Send Door Command Window


Step 3: The Delivery Report window will be shown. Ensure that all the door commands are successfully sent. Click Close to complete process.
Delivery Report Window
Figure 14: Delivery Report Window


Step 4: All physical doors selected will return to normal, secure operation.

Note

Users have to ensure that the necessary fire safety measures are taken and confirmed that the building is safe before returning the doors to normal secure operation.

Date Documentation:

31/5/2018 (Rev 1.0)

PROOF-READ

.

.


.

© MicroEngine Technology Sdn Bhd (535550-U). All rights reserved.