How to Configure Door Access Level at xPortalNet Software
Problem (Issue) Statement: | How to configure Door Access Level at xPortalNet software |
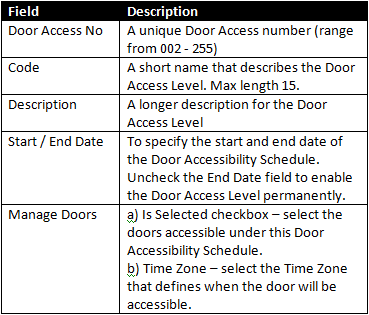
Description: | A guide to configure Door Access Level at xPortalNet software. This article will guide users to setup a Door Accessibility Level (Door Access Level) by setting the accessible Time Zone for each door. The Door Accessibility Level will then be assigned to individual card users to allow the system to determine the day and time the card user can gain access to the door. |
Related Software: |
|
Related Hardware: |
|
System Application: |
|
Symptom and Finding: | NA |
Cause: | For first time configuration on Door Access Level at xPortalNet software. |
Solution: | Warning!
. . Summary
Step-by-step Guide:
Step 1: Ensure that xPortalNet Services is running.
Note
Knowledge Base Link Users can refer to How to Configure Time Zone Settings in xPortalNet Software to configure the Time Zone settings.
|
Date Documentation: | 4/6/2018 (Rev 1.0) |


PROOF-READ
.
.
.
© MicroEngine Technology Sdn Bhd (535550-U). All rights reserved.