Summary
Step-by-step Guide:
Step 1: Ensure that the HID OMNIKEY 5421 / 5422 desktop reader is connected to PC and the device driver is installed before proceeding with the next step.
.
.
Step 2: Ensure that xPortalNet Services is running.
Step 3: Go to xPortalNet Client > Data Setup > System Setting > Software Setting.
Step 4: The System Properties window will be shown as below. Click Modify and click on Mifare Card Options tab to setup the configuration for programming the Mifare card sector reading & writing operations.

Figure 1: System Properties Window
Step 5: The Edit System Properties window will then be shown. By default, the Read Mode is "Card Serial No". Click on the drop-down dialog box and select "By Block" to enable Mifare card sector reading.

Figure 2: Edit System Properties Window
Step 6: At the Programming Mode drop-down dialog box, select "Write Sector For Proprietary Used" to allow read & write operation to the Mifare card sector.

Figure 3: Selecting Write Sector for Proprietary Used to Allow Read & Write Operations
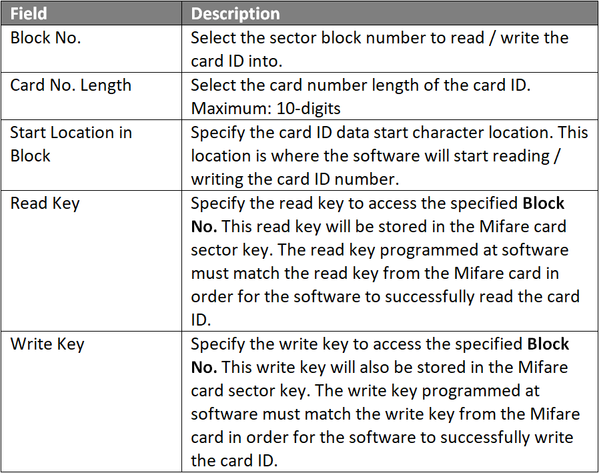
Step 7: The 3 fields that follows (Block No., Card No Length, and Start Location in Block) are user-definable fields to program the Mifare card sector.

Figure 4: An Example to Configure the Block No. Card No Length, and Start Location in Block
.
.
.
.
Step 8: The Send Data and Command window will then be shown. Wait for the data and command sending process to complete before clicking Close to continue.

Figure 5: Send Data and Command Window
Step 9: The Delivery Report window will then be shown. Click OK.
.
.
To setup the Mifare sector programming reader:
Step 1: Go to xPortalNet Client > Data Setup > Data Access Setting > Staff Record > Get Now! > Mifare Card Programming.

Figure 6: Mifare Card Programming Icon in Staff Detail Setup Window
Step 2: Click Reader Settings in the Mifare Card Programming icon.

Figure 7: Reader Settings Button in Mifare Card Programming Icon
Step 3: The following message window will be shown to indicate that the software did not detect a serial port. Click OK to continue.

Figure 8: No Serial Port Detected Window
Step 4: The Reader Settings window will then be shown. Select "Third-Party" at the Reader Selection field and confirm the Model Name of the Mifare sector programmer. Click OK to save the changes.

Figure 9: Reader Settings Window
.
.
- To write card ID number (Card No field in Add Staff Detail window) to Mifare card sector:
Step 1: Add a new staff / card user via the Add Staff Detail window. At the Card No. field, specify the card ID number to be programmed to the Mifare card sector.
.
.
.
.
Step 2: At the Staff Detail Setup window, select the card user to program the card ID (Card No. in Add Staff Detail window) and place the blank card on OMNIKEY card reader.

Figure 10: Staff Detail Setup Window
Step 3: Click Mifare Card Programming and select Write Card.

Figure 11: Write Card Button in Mifare Card Programming Icon
Step 4: Software will begin to write Card No. into Mifare card sector. Wait for the process to complete.

Figure 12: Operation in Progress Window Showing that the Mifare Card Programming is Completed
Step 5: Once the process is completed, the following message window will be shown to indicate that the Enrolment of Mifare card settings has succeed. The Mifare card can now be removed from the OMNIKEY reader.

Figure 13: Enrolment of Mifare Card Settings Succeed Window
.
.
To verity Card ID number(Card No field in Add Staff Detail window) from Mifare card sector after programmed:
Step 1: Place the programmed Mifare card on the OMNIKEY reader.
Step 2: Go to Mifare Card Programming and select Read Card.

Figure 14: Read Card Button in Mifare Card Programming Icon
Step 3: The software will read the Card No from Mifare card sector and the information of the card will be shown as below.

Figure 15: Details of the Read Mifare Card