How to Export xPortalNet software's staff records via SQL XPNDB folder
Problem (Issue) Statement: | How to export xPortalNet software's staff records via SQL XPNDB folder |
Description: | Users are unable to use the exported Staff Detail Listing in Excel file format from xPortalNet Client software to re-import back to xPortalNet Client software. |
Related Software: |
|
Related Hardware: | NIL |
System Application: | NIL |
Symptom and Finding: | The Staff Detail Listing file exported from xPortalNet Client software is very difficult to re-import back to xPortalNet Client. As each staff record's info is separated into two different rows, system users need to manually shift the second row's data to the first.
Figure 1: Sample of Exported Staff Detail Listing with the staff’s Info Separated into Two Different Rows |
Cause: | The exported Staff Detail Listing is unable to be directly imported to the Staff Records due to differing row formatting; and the software does not allow any modification to be done to the exported report format. |
Solution: | Warning!
. . Summary:
Step-by-step Guide:
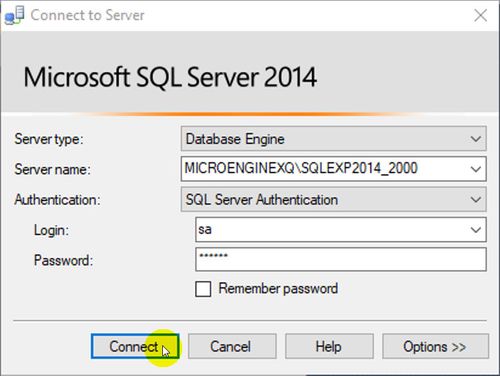
Step 1: Run Microsoft SQL Server Management studio, connect to the instance of the SQL Server Database Engine for xPortalNet software.
Figure 2: Connecting to the xPortalNet’s SQL Database Instance . Note
. . Step 2: Expand the Databases folder.
Figure 3: Expanding the Databases Folder . Step 3: Right-click XPNDB > Tasks > Export Data…
Figure 4: Right-clicking XPNDB and Selecting Tasks into Export Data . Step 4: The SQL Server Import and Export Wizard window will be shown. Click Next to continue.
Figure 5: SQL Server Import and Export Wizard Window . Step 5: At the Choose a Data Source window, make the following selections and click Next to continue.
Figure 6: Choose a Data Source Window . Step 6: The Choose a Destination window will then be shown. Select the Destination as “Microsoft Excel” and click Next.
Figure 7: Choose a Destination Window . Step 7: At the Specify Table Copy or Query window, check the Write a query to specify the data to transfer checkbox. Click Next to continue.
Figure 8: Specify Table Copy or Query Window . Step 8: At the Provide a Source Query window, edit the card number length from 10 to your system’s card number length in the SQL statement section. Copy and paste the data in the section to the next window. (System users can choose the required column info.) .
Figure 9: Provide a Source Query Window . Step 9: At the Select Source Tables and Views window, ensure that the Query checkbox is checked. Click Next to continue.
Figure 10: Select Source Tables and Views Window . Step 10: The Review Data Type Mapping window will then be shown. Click Next to continue.
Figure 11: Review Data Type Mapping Window . Step 11: At the Save and Run Package window, ensure that the Run immediately checkbox is checked. Click Finish.
Figure 12: Save and Run Package Window . Step 12: The following window will be prompted to indicate that the execution was successful. Click Close to continue.
Figure 13: The Execution was Successful Window .
Figure 14: The Example of the Exported Staff Detail Listing |
Date Documentation: | 12/7/2018 (Rev 1.0) |


PROOF-READ
.
.
.
© MicroEngine Technology Sdn Bhd (535550-U). All rights reserved.