| Problem (Issue) Statement: | How to Bulk Write Card Number for Mifare cards in xPortal3000 software |
| Description: | xPortal3000 software also allows users to perform bulk write operations for large number of Mifare cards to make the enrollment process simpler and faster. |
| Related Software: |
|
| Related Hardware: | NIL |
| System Application: | NIL |
| Symptom and Finding: | NIL |
| Cause: | For first time guide on how to Bulk Write Card Number for Mifare cards in xPortal3000 software. |
Summary:
. Step-by-step Guide:
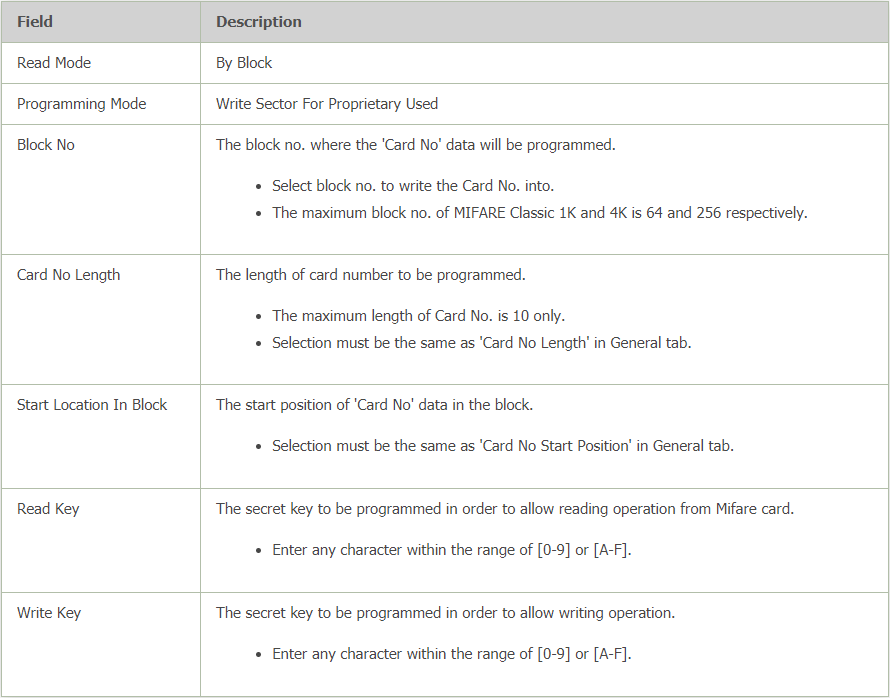
Step 1: Launch xPortal3000 Client > Control Panel > System Properties. The System Properties window will be shown. Click Modify > Mifare Card Options tab. . Step 2: The Edit System Properties window will then be shown. Refer to the following table for the settings to be configured. Click OK to save the changes made. .
. .
Step 1: Go to xPortal3000 Client > Staff Record > Add. The Add Staff Detail window will be shown.
. Step 2: Users can then proceed to configure the other relevant fields for this staff record. Click OK to save the changes. . .
Knowledge Base Link Check and ensure that the Programming Reader is properly plugged in and detected by the PC. Users may refer to How to Connect Mifare Programming Reader to xPortal3000 Software to Program Mifare Card for the complete steps to connect the Mifare Programming Reader to the PC. . . Step 1: Back at the Staff Detail Setup window, click on the Mifare Card Programming icon > Reader Settings. . The Reader Settings window will then be shown. Select the Serial Port number to which the Mifare Programming Reader is connected to the PC. Click OK to save the changes. . Note The Reader Settings configuration highlighted in this section only needs to be configured once before the use of the Mifare Programming Reader. . .
Step 1: Go to xPortal3000 Client > Staff Record. The Staff Detail Setup window will be shown. Click on the Mifare Card Programming icon > Bulk Write Card. . Step 2: The Select User window will be shown. Filter the staff records which the Card Number is to be programmed and click OK to proceed. . Step 3: The Bulk Write Card window will then be shown. Click Start to start the card programming . Knowledge Base Link Users may refer to for the complete information on the Bulk Write Card window. . . Step 4: The following window will be shown to prompt users to place the card to be programmed on the programmer. . Step 5: The software will then begin to program the cards. Once the card is successfully enrolled, the following message window will be shown to prompt users to place the next card.
. Step 6: Place the next card to be enrolled. Repeat Step 5 to enroll all remaining cards. Once all cards have been enrolled, the following window will be shown. Ensure that all card enrolment statuses are shown as "Success". . Step 7: The software will then show the following message window to prompt users to save the writing process. Click Yes to save the results. | |
| Common Issues: | NIL |
| Porting Date: | 5/7/2019 |


PROOF-READ
.
Related Articles.
Containing the label "programming-reader"
Filter by label
There are no items with the selected labels at this time.
.
.